Implementation Principles for RBAC in a Microservices Stack
How Centralized RBAC Fits Into a Modern Architecture
Why You Shouldn’t Hand-Roll Authorization Anymore
Step-by-Step: Implementing the RBAC Layer


When building internal tools at scale, whether it’s a developer portal, an audit dashboard, or a CI/CD orchestrator, access control quickly stops being a feature and becomes a risk surface. In a past role, I worked on a multi-tenant deployment platform used by dozens of internal teams. A misconfigured authorization rule allowed a junior engineer to deploy to production instead of staging, a classic example of how fragile hand-rolled RBAC can lead to real security incidents. It wasn’t malicious, but it took down a customer-facing API. Most access-related incidents stem not from code defects, but from the absence of proper contextual enforcement and boundary controls.
In a lifecycle, especially one that’s regulated or customer-facing, the strategic imperative is not whether to adopt RBAC, but how to implement it early without disrupting operational continuity. From developer environments to admin consoles and feature toggles, every internal interface becomes a potential vector for misuse. Engineers, platform teams, and security leaders all want the same thing: to move fast without sacrificing control. RBAC offers a structured way to scale those guarantees.
This post is for DevSecOps leads, product security engineers, and platform architects who’ve either implemented or are planning to roll out RBAC in their stack. We’ll walk through how to do RBAC properly, at the code level, across environments, and with real UI examples, using a sample app we built from scratch: a small e-commerce product-catalog demo implemented with Next.js (Next API routes + React frontend), Node/Express-style handlers, PostgreSQL, JWT authentication, and Oso as the centralized policy engine. Instead of hand-writing permission checks across controllers, routes, and UI components, we implemented policies once in Oso (the .polar file), wired the app to call isAllowed(user, action, resource) from server routes, and then surfaced role-aware controls in the Next.js UI. That means you can see exactly how much boilerplate, edge cases, and brittle logic Oso replaces, things you would otherwise have to design, implement, and test yourself (role mapping, environment scoping, audit trails, revocation, partial evaluation and caching, etc.). Along the way we’ll discuss tradeoffs of hand-rolled logic, show how Oso simplifies role-based access management, and spell out what “enterprise-ready” RBAC looks like in practice.
RBAC (Role-Based Access Control) is an authorization model designed to manage who has access to what in a system. Rather than assigning permissions directly to individual users (which quickly becomes unmanageable), RBAC introduces an abstraction:
This creates an access system that scales cleanly as your app grows. For example, a user with the Collaborator role can edit product details or post comments, but they can’t delete products, that action is reserved for Owners. The system doesn’t check for individual user IDs (e.g., “is user123 the product creator?”); instead, it checks the user’s role against the policy attached to that role. By avoiding hardcoded checks like “only the creator of this product may delete it”, you remove scattered exceptions and let Oso enforce consistent rules across every endpoint. When a role’s permissions change, the new behavior applies immediately without rewriting business logic.
Without access boundaries, everything becomes a potential point of failure: not just the services, but the humans operating them. Teams accidentally ship to the wrong environment, over-provision infrastructure, or expose sensitive data, often because they had more access than necessary.
RBAC enforces the principle of least privilege, which says users should only have the minimum permissions needed to do their jobs. For example, in a product catalog app, a Viewer can read product listings but can’t edit or delete them; a Collaborator can update descriptions or add comments but still can’t remove products; and only an Owner has full control, including deletion. This role separation limits the blast radius of mistakes (a Viewer can’t accidentally wipe data), keeps behavior predictable, and gives security teams confidence that access is consistently enforced without blocking day-to-day work.
What about Agents?
If you thought managing permissions for human users was hard, wait until your “user” starts acting autonomously.
Permissions are already a major risk: broken access control has climbed to #1 in the OWASP Top 10 list of application-security failures. But while a human with excess permissions is dangerous, an AI-agent with broad access can cause orders of magnitude more damage.
That’s why traditional RBAC, built for predictable human roles, may not suffice when you deploy autonomous agents. These agents:
Operate continuously and at high speed
Use tools and access patterns you might not fully predict
Are vulnerable to prompt injection, chaining of tools, and unplanned workflows
At Oso, we’ve extended the RBAC conversation to include autonomous workloads: our Automated Least Privilege for Agents offering continuously observes agent access decisions, detects anomalies, recommends tighter permissions, and enforces fine-grained control. So while RBAC remains a foundational model, you should think of it as one part of an agent-aware access strategy: define roles, but then monitor, restrict, revise.
Want to see how it works in practice? Learn more about Automated Least Privilege for Agents.
In a well-structured production system, Role-Based Access Control (RBAC) shouldn’t be scattered as if/else checks deep inside application code. It should be treated as its own dedicated service or infrastructure layer, on the same footing as your identity provider and authentication mechanism. RBAC acts as the policy-enforcement counterpart to authentication, while principles such as environment isolation (separating dev, staging, and prod) define the boundaries in which that layer operates. This section walks through how a role-based access control system fits into a modern stack, how it interacts with the rest of the infrastructure, and where each responsibility actually lives in practice.
The following architecture supports fine-grained authorization across a distributed stack:
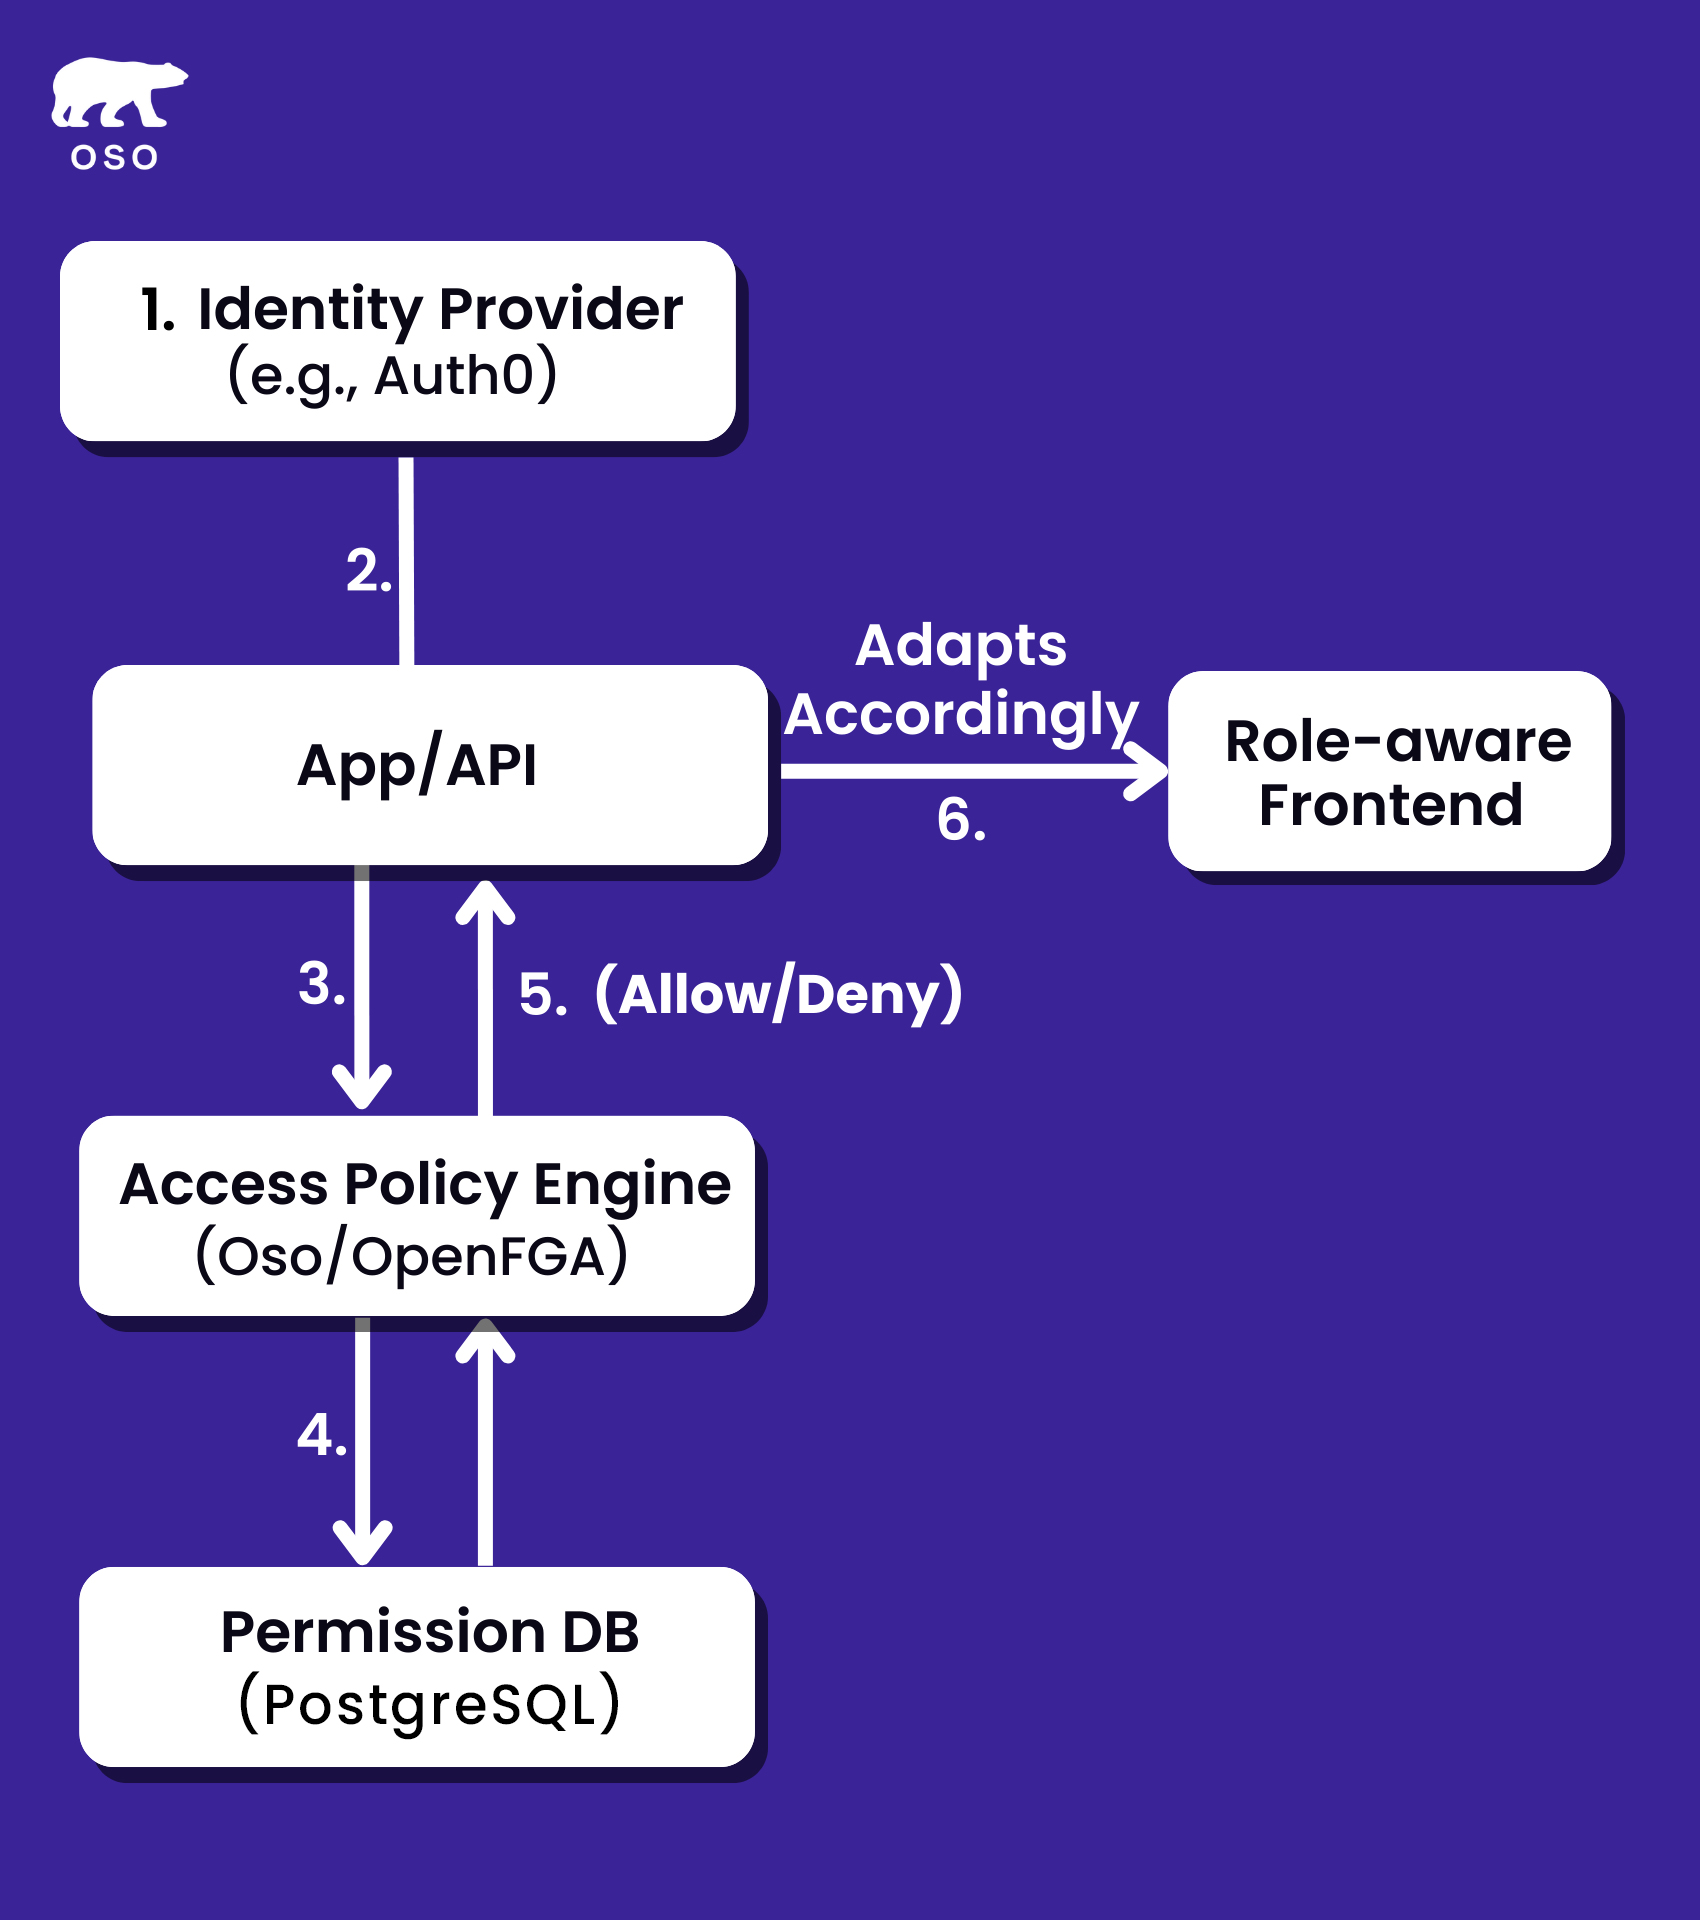
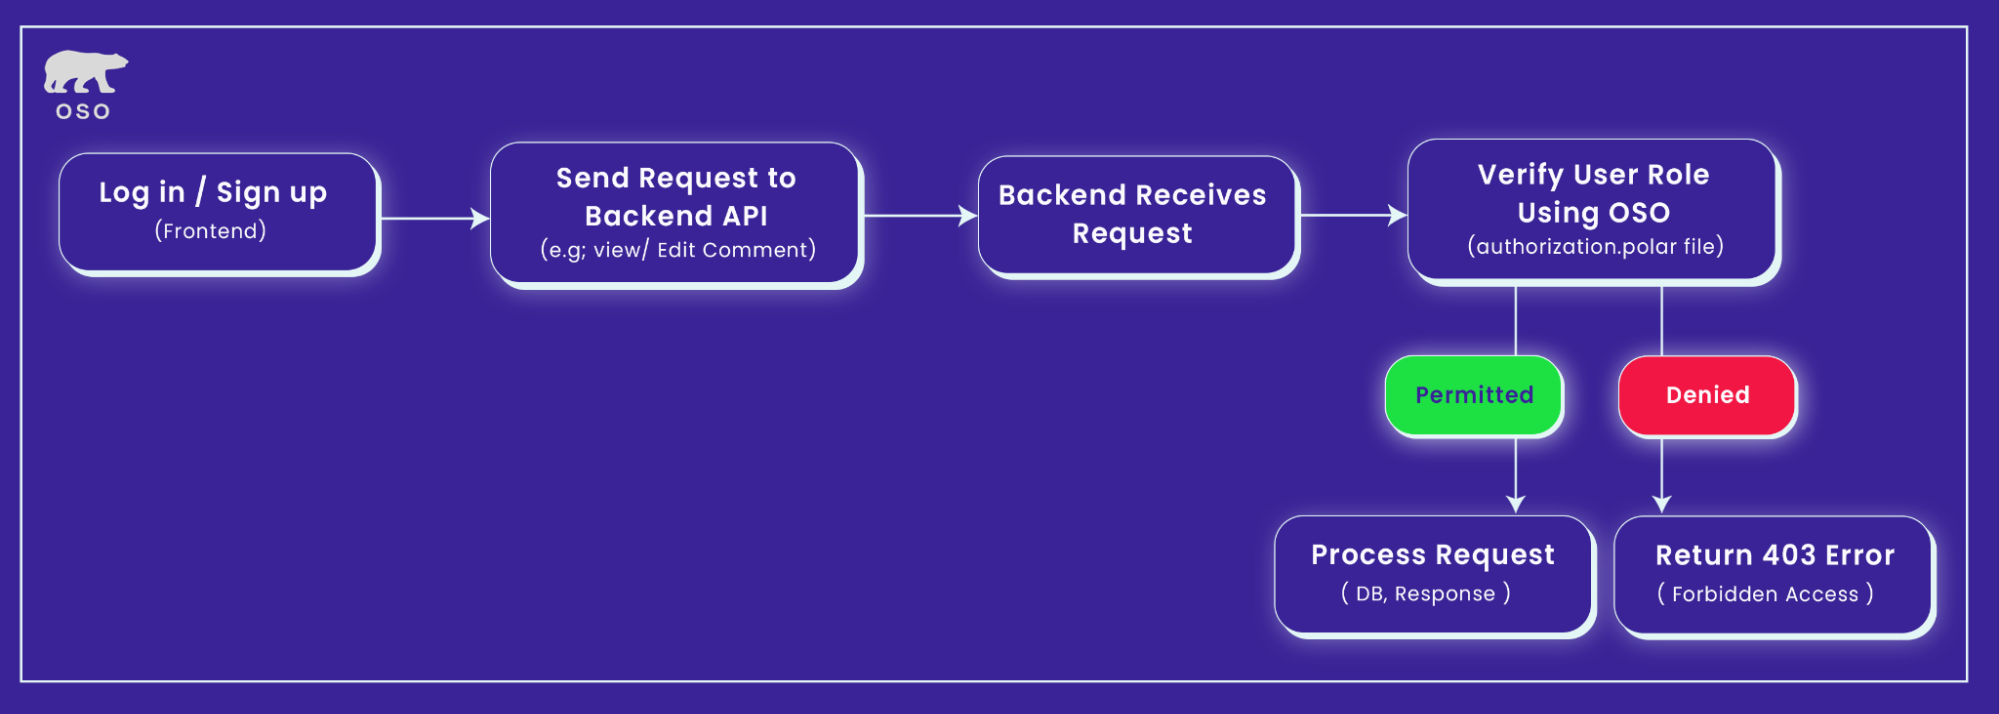
The flow begins with the Identity Provider, such as Okta or Auth0, which handles user authentication. After the user logs in, the Identity Provider issues an identity token (e.g., JWT) containing user information like ID, email, and sometimes role metadata.
After successful authentication, requests are forwarded to the App/API layer, which acts as the initial entry point for processing the request. The App/API interacts with the Access Policy Engine to check permissions before taking any further action.
This is where role-based access decisions are made. The engine evaluates whether a specific user is authorized to perform a certain action on a given resource (e.g., “Can this user update this document?”). It could be a system like Oso, OpenFGA, or a custom-built solution.
The Access Policy Engine queries the Permission Database to evaluate relationships between users, resources, and actions. For example, it checks whether "User A" has permission to "Update" a specific resource or if "Collaborator" has permission to "Delete a comment." The Permission DB is optimized for fast lookups and stores this mapping information, often populated by role assignments or sync jobs.
The Access Policy Engine processes the permission check and returns a final authorization decision. The App/API then either proceeds with the requested operation or returns a 403 Forbidden error if the user is not authorized to perform the action.
The frontend, built with Next.js or similar frameworks, adjusts its UI based on the user's roles or permissions. It ensures that only the relevant UI elements (e.g., buttons, forms, pages) are visible or interactive, aligning with the backend's access control decisions to maintain a consistent user experience.
Beyond the high-level flow, it helps to ground this in a real business use case. Assume a product catalog app where different users, Owners, Collaborators, and Viewers, need different levels of access to products and comments. Owners can add or remove products, Collaborators can edit and comment, and Viewers can only browse. On the surface, this sounds simple, but if you tried to hardcode these rules into every API route, frontend component, and database query, it would quickly become complex, brittle, and time-consuming to maintain.
That’s why we built this demo app with Oso. Instead of reinventing the wheel or writing a custom authorization framework from scratch, we used Oso’s open-source policy engine to centralize and declare all role logic at once. The app itself is deliberately lightweight, Next.js frontend, Node/Express-style API routes, and PostgreSQL for persistence, but it demonstrates how even a “small” product can benefit from a dedicated RBAC layer. With Oso handling the rules, the implementation becomes practical, auditable, and easy to extend, which is what you need in a production microservices stack.
Every access control system begins with identity. Users must be authenticated before any permissions can be evaluated. Most production systems rely on an Identity Provider (IdP) such as Okta, Auth0, or an internal OIDC-compliant service. Once a user is authenticated, the IdP issues a token (typically a JWT) containing identity claims like user ID, email, organization ID, and sometimes role identifiers. These identity claims are then passed downstream to any service requiring authorization logic.
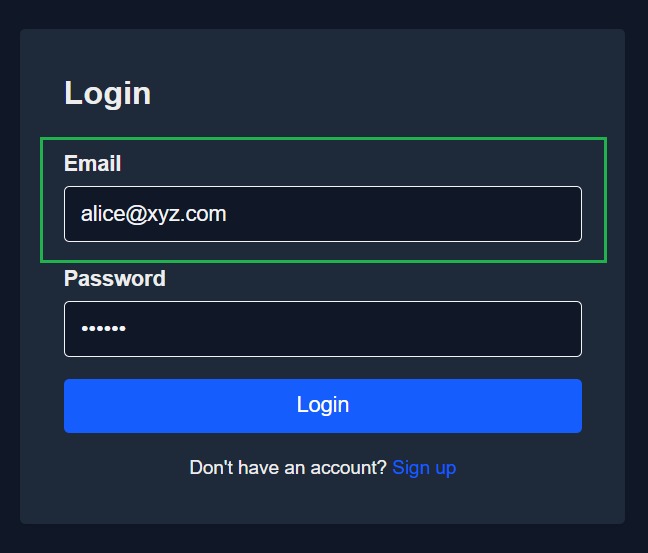
In our demo app, this process starts at the login page (screenshot above). A user signs in with their email and password, the app verifies their credentials, and a JWT is issued containing their user ID and assigned role (Owner, Collaborator, or Viewer). That token is then included in all subsequent requests to the backend, where Oso evaluates whether the user is allowed to perform the requested action.
After authentication, requests flow into the App/API, which acts as the main entry point for business logic. At this stage the application does not decide permissions on its own. Instead, it forwards the user identity and requested action to the authorization layer. This separation avoids oversized, permission-stuffed tokens and keeps enforcement auditable.
Oso’s recommended patterns include:
This approach ensures decisions reflect the most current permissions, avoids token bloat, and keeps your authorization logic auditable and maintainable across services.
If a user with access Y is trying to access resource X, it throws an access denied message.
The key advantage of having a separate RBAC engine is that the logic becomes reusable, auditable, and environment-aware. Whether you’re calling it from a backend route, an internal tool, or a CLI-based automation script, the permission logic remains consistent. This separation of concerns also makes it easier to manage and evolve your role based access control model over time, as permissions change or new roles are introduced.
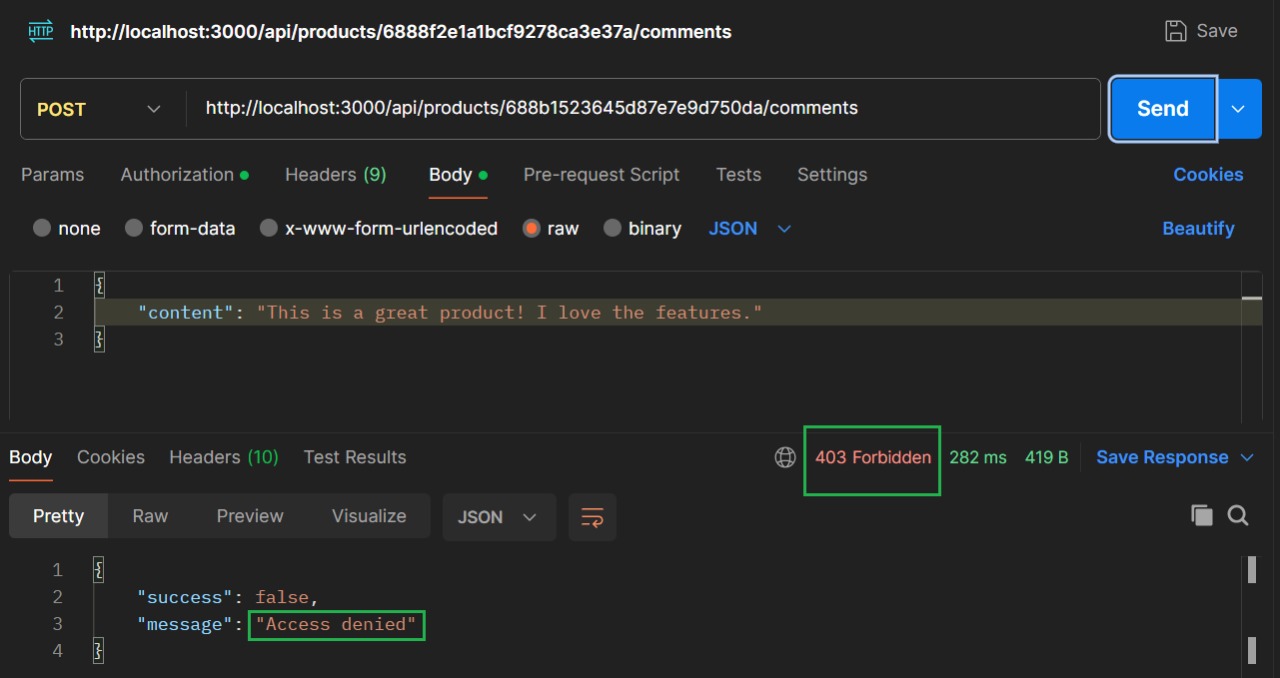
Here, we showed how that token flows into backend routes, using Postman to test requests like “view product” or “edit product.” Those tests made it clear that identity alone isn’t enough, we still need a consistent way to decide what that user can do once authenticated.
That’s where the RBAC engine comes in. The key advantage of separating authorization into its own engine is that the logic becomes reusable, auditable, and environment-aware. Whether you’re calling it from a backend route, an internal tool, or a CLI-based automation script, the same permission logic applies everywhere. This separation of concerns makes it easier to evolve your RBAC model over time, as roles change or new ones are introduced.
The policy engine is where authorization actually happens. Given (user, action, resource), it evaluates whether the operation is permitted based on centrally defined policies. For example, Oso lets you encode:
allow(user, "update", product) if user.role = "collaborator";
allow(user, "delete", product) if user.role = "owner";
On the frontend, the app doesn’t enforce authorization, but it still needs to mirror backend rules for a smoother user experience. For example, if a user is a Viewer, the “Edit Product” button should already be greyed out rather than throwing a 403 after they click it. This prefetching of effective permissions ensures the UI matches what the backend enforces, reducing errors and confusion.
A persistent store underpins the policy engine, tracking user-role assignments and mapping them to resources. This store (often backed by PostgreSQL or similar) captures relationships like role inheritance, project scoping, or environment-specific restrictions. Defining permissions declaratively in version-controlled policy files provides auditability, clarity, and maintainability.
This store also plays a critical role in providing auditability. By tracking which roles exist, what permissions they hold, and how they’re used, the system can generate logs and reports for compliance and debugging purposes. Every permission decision can be traced back to a clearly defined rule or role mapping, reducing ambiguity when things go wrong.
After evaluation, the policy engine returns an allow/deny decision. The App/API enforces this outcome: if permitted, the request continues; if not, it returns a 403 Forbidden. Every decision can be logged, giving you an audit trail of who tried to do what and when.
While the frontend may receive minimal role or identity information (e.g. "role": "collaborator"), it should never enforce access control directly. Instead, the UI adapts behavior, such as hiding buttons or disabling actions, for better user experience.
However, all authorization decisions must still be enforced in the backend, where the service calls into Oso’s policy engine (e.g. isAllowed(user, action, resource)) to validate whether the requested operation is permitted. This guarantees consistency, auditability, and prevents misuse via tools like Postman or cURL.
By avoiding client-side permission caching or local storage of permission hashes, the system maintains a single, centralized source of truth for all access logic: declarative, testable, and enforceable.
Up to this point, we’ve focused on the app-level flow, login, backend checks with Oso, role storage, and a frontend that adapts to permissions. That gives us a clear view of how RBAC works within a single application. But in production, you rarely have just one app. You’re running multiple services behind gateways, identity providers, and caches.
To understand how centralized RBAC holds everything together in that larger picture, let’s step back and look at how it fits into a modern microservices architecture.

This diagram represents a role-based access control (RBAC) system architecture implemented across a microservices-based backend, with an API Gateway, Authn Server, Token Store, and local caching at multiple layers. Here's a step-by-step explanation of how it works:
The user authenticates through an Identity Provider (IdP) like Okta or Auth0. Upon successful login, the IdP issues an identity token (typically a JWT) containing basic user claims, such as user ID and email, but not full access rights or roles. This token is strictly used for authentication, not for enforcing permissions.
The API Gateway acts as a routing layer. It forwards requests to the relevant backend microservices without making any authorization decisions itself. Unlike traditional architectures that rely on token-scoped permissions at the gateway level, this model ensures that all access control logic is centralized and auditable.
When a service (e.g., Inventory Service, Product Service) receives a request, it performs an authorization check by invoking isAllowed(user, action, resource) on Oso. Oso evaluates the request against its .polar policy file to determine whether the action should be permitted.
This dynamic, runtime evaluation ensures that:
To improve performance, caching is employed inside the authorization engine (e.g., Oso Cloud) for stable parts of policy execution (such as policy compilation) so redundant work is minimized. Some optimizations include visibility into policy versioning (so you can see when policies update) and support for time-based access expiry.
For example:
Since all authorization decisions are made per request and per resource by Oso, both the frontend and backend operate off the same access logic. The UI can query what the current user is allowed to do and render controls accordingly, while the API enforces those rules regardless of frontend behavior.
Contemporary security architectures abstract authorization into policy engines, eliminating hand-written, route-level access checks:
Instead, you plug into a declarative, unified access layer, like Oso, and make authorization an API, not a part of your codebase. This architecture eliminates scattered permission checks and gives you a scalable foundation for consistent access enforcement across services and interfaces.
But even with the right architecture, how you define and enforce policies still determines success. Here's why centralized, declarative authorization is now the baseline, and why hand-rolled logic no longer cuts it.
Authorization used to be baked directly into the application layer. Every microservice had its own version of role mapping. Routes were guarded with one-off isAdmin checks. Access was defined in YAML files, controller logic, and conditional middleware scattered across codebases. It may have worked in the early days, but once you’re managing multiple services, environments, and personas, that approach turns into a liability. There’s no single source of truth, no audit trail, and no consistency across the stack.
As soon as new components like internal admin panels, agent-based automation, or AI orchestration chains are introduced, the old model breaks entirely. Each part of the system ends up reinventing access control in its own silo. And that makes it impossible to reason about, or enforce, security at scale.
Modern authorization is externalized into a unified access layer. Instead of encoding roles and permissions directly into app logic, you define policies declaratively, using a tool like Oso, OpenFGA, or Cedar. These tools let you describe RBAC rules in a structured language. You define roles, permissions, relationships, and scopes in a way that’s consistent and testable. Then you integrate the policy engine as an API that your services, tools, and agents can call in real time.
You don’t repeat logic across your backend, frontend, and automation layers. Access decisions are made programmatically and deterministically, eliminating ambiguity and ensuring policy fidelity. This approach turns authorization into infrastructure, not a set of scattered decisions.
The project is structured around a classic fullstack architecture: Express.js for the backend API, PostgreSQL as the database layer, and a frontend UI built with Next.js. We chose this stack to demonstrate how RBAC enforcement can be cleanly embedded into real-world app layers, not just as a backend filter but as an end-to-end access boundary. The user management flow includes registration, login, and protected routes, all wired to a simple JWT-based session system. Authentication happens first, and role-based authorization follows immediately after.
Users are assigned one of four roles, owner, collaborator, viewer, developer, persisted in PostgreSQL. At login, the role is issued as an identity claim in the JWT so the frontend can render the right controls. We never authorize the token. On every request, the API loads the user & target resource from PostgreSQL and asks Oso, via isAllowed(user, action, resource). This keeps identity in the token and authorization in policy. (See Oso request-level enforcement.)
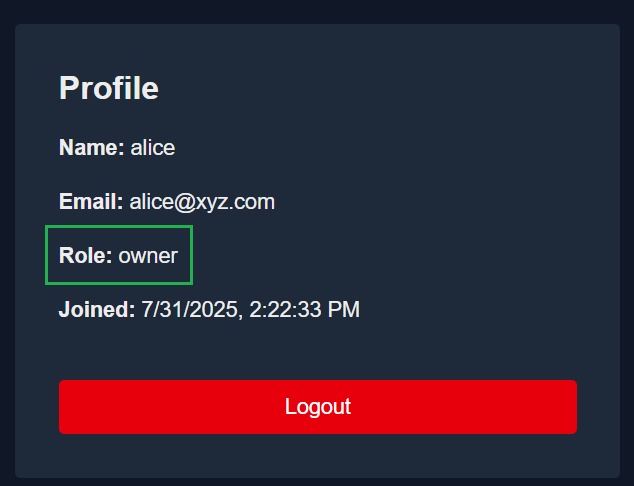
The owner role grants full permissions, including viewing, commenting, editing, and deleting any product in the system.
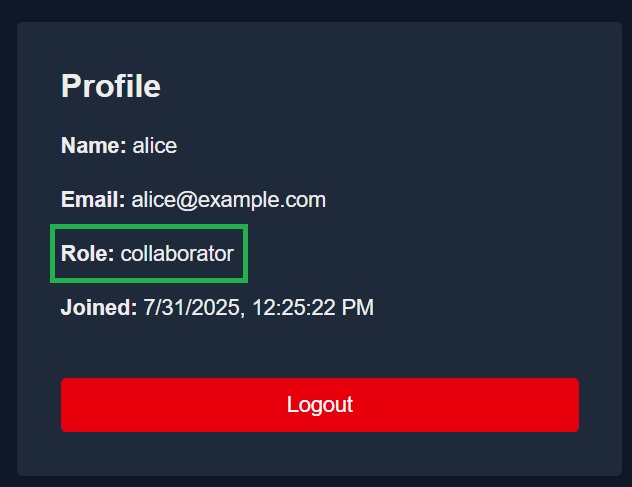
The collaborator role allows the user to view and comment on products, and make limited edits, but lacks deletion privileges.
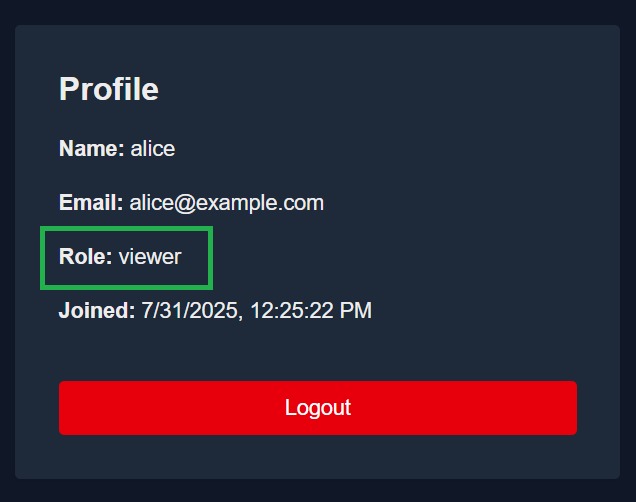
The user is assigned the viewer role, which grants read-only access across the application without permissions to comment, edit, or delete.
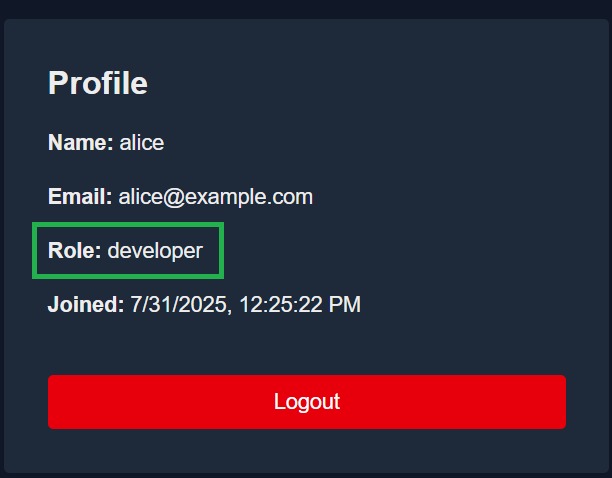
The developer role is a special-purpose role with scoped access for debugging or staging environments, not intended for production changes.
At the core of our access control system is Oso, a policy engine that defines access logic in a .polar file.
Each permission check boils down to one question:
“Is this user allowed to perform this action on this resource?”
To evaluate that, we:
Oso checks the policy rules and returns yes/no, no conditional branching or role checks cluttering the controller logic.
# User roles
allow(user, "read", _product) if user.role in ["owner", "collaborator", "viewer", "developer"];

allow(user, "create", _product) if user.role = "owner";

allow(user, "update", _product) if user.role in ["owner", "collaborator"];

allow(user, "delete", _product) if user.role = "owner";


# Comment permissions
allow(user, "comment", _product) if user.role in ["owner", "collaborator"];

allow(user, "read", _comment) if user.role in ["owner", "collaborator", "viewer", "developer"];

allow(user, "delete", comment) if
  user.role = "owner" or
  (user.role = "collaborator" and comment.authorId = user._id);

# User management (only owners can manage users)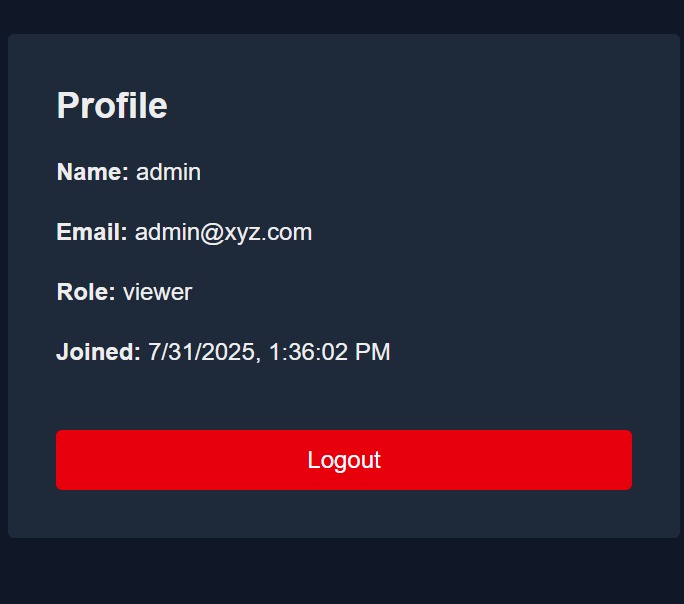
allow(user, "manage_users", _) if user.role = "owner";Once the authorization engine is in place, we connected the frontend to reflect the same access rules visually. After login, users are shown their role in the profile view. Based on that role, certain actions become available or hidden.
For role-based access control example:
Policy changes are centrally managed within the .polar file, ensuring consistent, maintainable enforcement.
# User roles
allow(user, "read", _product) if user.role in ["owner", "collaborator", "viewer", "developer"];

allow(user, "create", _product) if user.role = "owner";

allow(user, "update", _product) if user.role in ["owner", "collaborator"];

allow(user, "delete", _product) if user.role = "owner";

# Comment permissions
allow(user, "comment", _product) if user.role in ["owner", "collaborator"];

allow(user, "read", _comment) if user.role in ["owner", "collaborator", "viewer", "developer"];

allow(user, "delete", comment) if
  user.role = "owner" or
  (user.role = "collaborator" and comment.authorId = user._id);

# User management (only owners can manage users)
allow(user, "manage_users", _) if user.role = "owner";
These visual controls are purely cosmetic: the real enforcement happens in the backend, but they help create a role-aware interface that prevents user confusion or error. And since permissions are checked again in every API call, there’s no way to bypass access via tools like Postman or cURL.
Instead of scattering role checks across controllers, all access rules live inside authorization.polar. This becomes the single source of truth for permissions.
For example, if we want to give collaborators delete permissions in the future, we’d edit one line in the .polar file, reload the policy, and the entire app respects the new rule, no middleware rewrites needed.
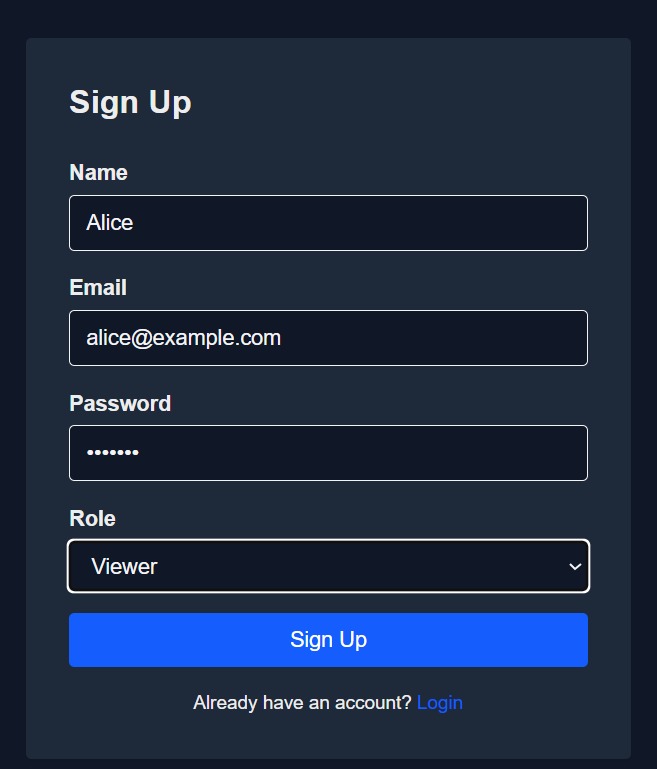
To test the full flow, users can register with different roles either through the /register route in the frontend or directly via the API.
Once logged in, their role and access level are reflected on the /profile page. From there, they can access /products to view items, attempt edits, or post comments, depending on their permissions.
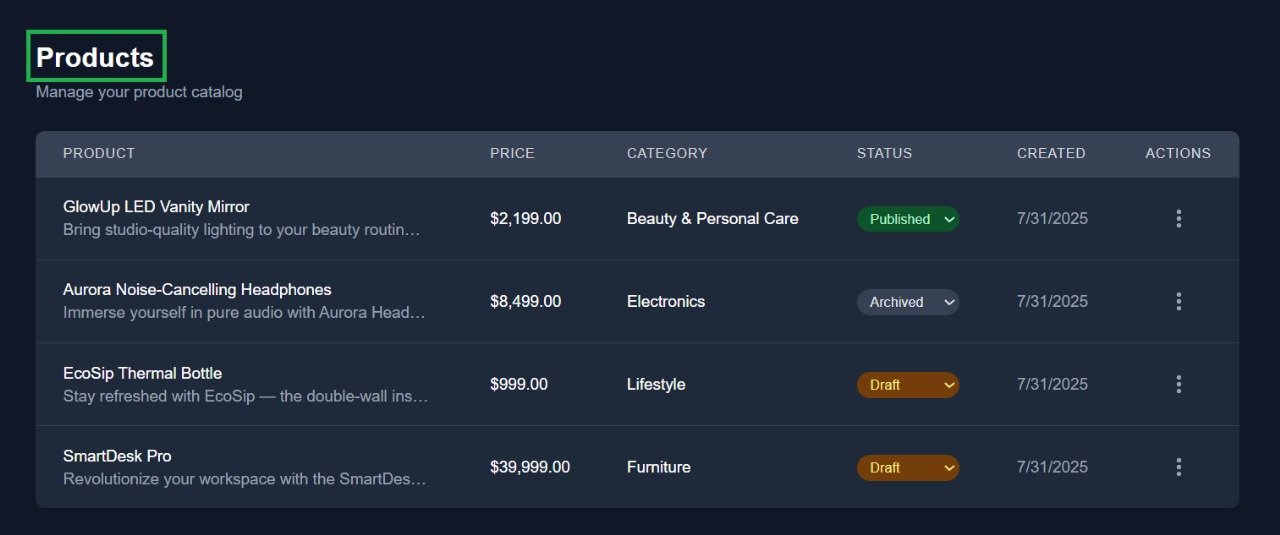
This is the main product listing screen where users can view all available products along with their status, category, and creation date.
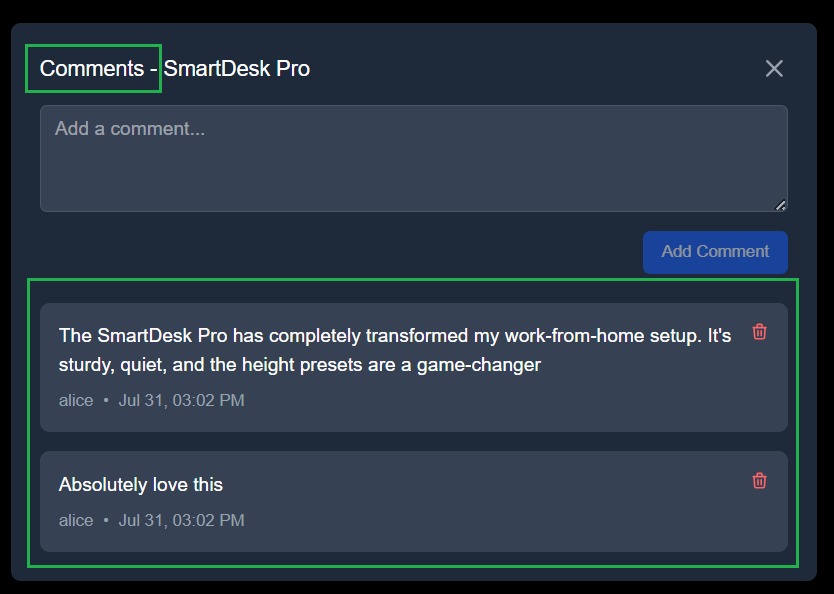
The comment section allows users to read or add comments for a specific product, with RBAC deciding who can post or delete.

Users with appropriate permissions can access detailed metadata views, showing full metadata like status, creation date, and last modified timestamp.
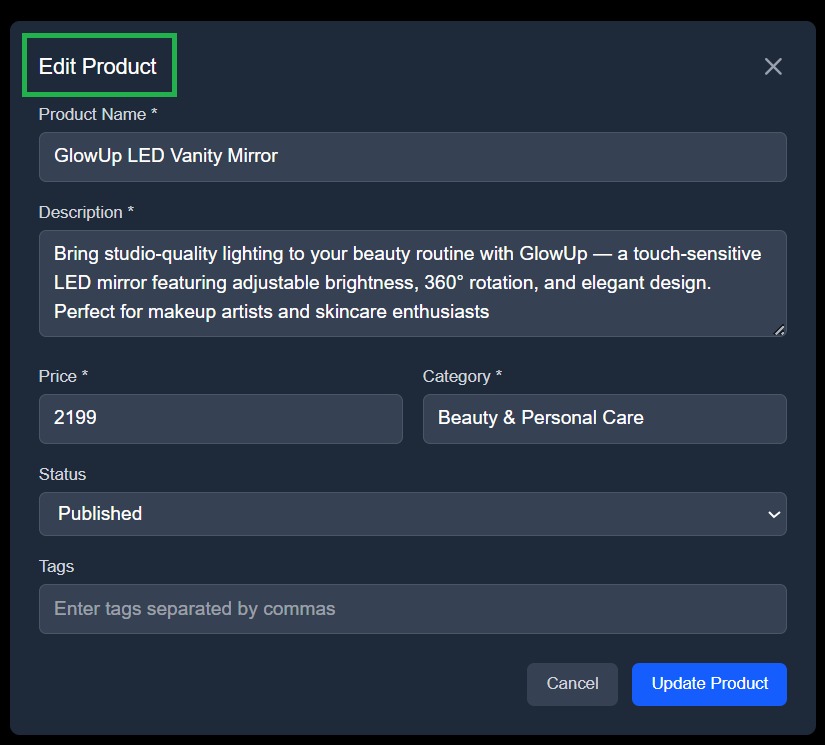
This modal provides fields for editing product details like name, description, category, and status, editable only if the user’s role permits it.
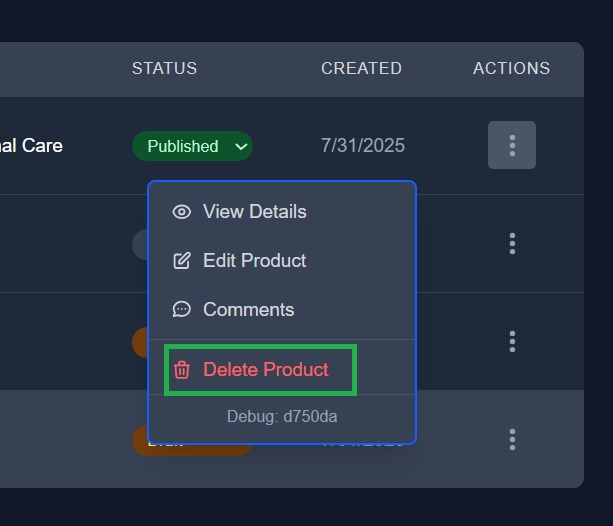
Only users with the appropriate role (e.g. Owner) see the “Delete Product” action in the dropdown, enforced both in UI and backend.
Every action hits a protected backend endpoint, which consults the Oso engine before proceeding. Unauthorized actions result in a 403 response, and authorized ones continue to the business logic layer. This flow enforces that access control is not optional or assumed, it’s part of the request lifecycle.
When designing access control, roles, permissions, and resources define exactly who can create a project, edit someone else’s comment, or even see that a project exists at all.
In our e-commerce product catalog system, the resource is the Product entity and its associated metadata (comments, visibility status, creation time). Each product lives in a system where access isn’t flat; it varies per user, depending on what role they’ve been assigned.
The actions on these resources include create, edit, delete, comment, and view. For example, an Owner can create and delete projects; a Collaborator can’t create new projects but can still comment and make edits; a Viewer can only observe, no mutations allowed.
We’ve broken the system into clear roles to reflect common collaboration patterns in product teams:
Imagine these roles like access cards in a secure office building. A Viewer has a guest pass, able to walk around and observe, but not touch anything. A Collaborator is like a contractor with a desk, they can make edits, leave notes, and work on existing assets. An Owner holds the master key: they manage the layout, invite others, and remove or reshape the entire structure.
We’re using Oso to formalize these boundaries in code. Oso allows us to declare relationships between users and resources, and then map specific permissions to role levels. So when a request comes in to delete a project, Oso can evaluate: is this user related to this project as an Owner? If yes, allow the action. If not, block it.
Without Oso, you'd be left stitching together authorization logic manually across every part of your stack. Each service would need to implement its own version of access checks, maybe using raw conditionals, a homegrown roles table, or a custom canAccess() function that slowly balloons with edge cases. For every new resource type, you'd have to write fresh logic to define how users relate to it. If you needed to support cross-resource conditions, like “can delete this project only if the user is also an admin of the parent org,” you'd be threading business rules through multiple layers of code.
This file directly shows what authorization looks like without Oso: role checks embedded inside API route logic. It’s exactly the kind of tight coupling and imperative branching that your Oso-based app avoids.
async function handleGetProducts(req, res) {
    try {
        const user = await getAuthUser(req);
        if (!user) {
            return res.status(401).json({ success: false, message: 'Authentication required' });
        }

        const allowedRolesToRead = ['owner', 'collaborator', 'viewer', 'developer'];
        if (!allowedRolesToRead.includes(user.role)) {
            return res.status(403).json({ success: false, message: 'Access denied' });
        }

        const { page = 1, limit = 10, search, category, status } = req.query;
        const skip = (page - 1) * limit;

        let query = { isActive: true };
        if (search) {
            query.$text = { $search: search };
        }
        if (category) {
            query.category = category;
        }
        if (status) {
            query.status = status;
        }

        const products = await Product.find(query)
            .populate('createdBy', 'name email')
            .populate('lastModifiedBy', 'name email')
            .sort({ createdAt: -1 })
            .skip(skip)
            .limit(parseInt(limit));

        const total = await Product.countDocuments(query);

        res.status(200).json({
            success: true,
            data: {
                products,
                pagination: {
                    page: parseInt(page),
                    limit: parseInt(limit),
                    total,
                    pages: Math.ceil(total / limit),
                },
            },
        });
    } catch (error) {
        console.error('Get products error:', error);
        res.status(500).json({ success: false, message: 'Internal server error' });
    }
}
As the system grows, so does the complexity. You’d eventually have to build your own policy evaluation layer, your own relationship graph, and your own internal DSL just to keep permissions sane. And even then, there's no standard way to audit what rules exist or test them independently. You're not just maintaining the product, you're maintaining a second, invisible product called "the authorization system," and it's leaking into everything.
Instead of baking permissions directly into each route handler, we now have a centralized engine that knows what every user can and cannot do. This not only prevents unauthorized actions, it also simplifies both debugging and UI logic. As you’ll see later, the frontend can now query what a user is allowed to do before showing buttons or actions. This eliminates the need for embedded role conditionals, promoting centralized governance and auditability.
As your system grows, authorization can’t live scattered across controllers and frontend checks. It needs to be centralized, declarative, and enforced consistently across every layer, API, UI, and automation. That’s exactly what we built: a fullstack RBAC system where access decisions are cleanly separated from business logic and evaluated through a purpose-built policy engine.
Using Oso with Express and PostgreSQL, we formalized user-role-resource relationships in code, enforced permissions at runtime, and exposed a frontend UI that reflects the same logic visually. The result is an architecture that’s not just functional, but scalable, where access rules live in one place, apply everywhere, and evolve cleanly over time.
RBAC isn’t just about restriction, it’s about control. The right model protects velocity while preventing production drift. With a centralized policy layer, your system becomes safer to build on, easier to reason about, and ready for the complexity that comes with scale. Curious how RBAC compares to attribute-based access control? Read our breakdown of RBAC vs ABAC for deeper insight.
User-scoped permissions are assigned directly to an individual, custom, explicit privileges. Role-scoped permissions are attached to a named role, which is then assigned to users. Role based access control models scale better, while user-scoped models offer precision (at the cost of manageability).
Yes, for early-stage systems or simple permission models, YAML or JSON config files work fine. Just make sure to reload them safely and avoid hardcoding paths. For dynamic environments or per-project scoping, a DB-backed model with a policy engine (like Oso or Casbin) is more appropriate.
Treat permissions like any other contract. Write unit tests for permission-checking logic, mock role assignments, and assert expected access outcomes. For integration tests, run flows under different simulated users and validate that protected actions are blocked or allowed accordingly.
RBAC governs who can access what, but it doesn’t cover everything. For complete security, you still need input validation, rate limiting, secrets management, and infrastructure hardening. Think of RBAC as necessary but not sufficient, a foundational layer, not the whole structure.