Chapter V: Relationship-Based Access Control (ReBAC)
Relationship-based authorization, or ReBAC, means organizing permissions based on relationships between resources. These relationships can include:
Data ownership, such as letting the user who created the post to edit it.
Parent-child relationships, like an organization and the accounts that belong to it.
Groups, such as teams whose members have common permissions.
Hierarchies, like managerial reporting structures.
In this guide, we’ll:
Discuss modeling, implementing, and evaluating each of these ReBAC strategies, i.e. the what, how, and when. This is where we’ll focus most of our time.
Compare ReBAC to other authorization strategies like RBAC and ABAC.
Dive into how Google Zanzibar works as a system to manage relationship-based authorization.
Authorization Academy Recap
Welcome to chapter four of Authorization Academy! You might have come straight from the earlier chapter, or maybe it’s been a little while. In either case, let’s do a quick recap:
InWhat is Authorization? we covered how to think about authorization architecturally — where should you apply enforcement and where do you make authorization decisions? This will be relevant again as we think about how to implement models based on relationships.
InRole-Based Access Control (RBAC) we looked at modeling roles, where you group sets of permissions into roles like “user” and “admin.”.
In Attribute-Based Access Control (ABAC), we explored assigning permissions based on attributes, such as location or device, to achieve finer-grained authorization.
If you’re new to authorization models, we recommend going through these two guides first. We’ll be talking about relationships in this guide, and thinking about roles as a type of relationship is a great starting point.
1. Modeling Authorization as Relationships
In this chapter, we’re going to talk about relationships and the notion of relationship-based access control or ReBAC. From an implementation standpoint, relationships look very much like roles. You can use relationships as a handy mental model for how to implement authorization and how to communicate it to your users.
Our Favorite Example App: GitClub
We’ll continue to use the GitClub example application that we introduced in What is Authorization? and we continued to use in the previous chapter. As a reminder: GitClub is a website for source code hosting, collaboration, and version control, similar to real-life applications GitLab and GitHub. GitClub offers a pure example of what motivates authorization in the first place — securing access to resources. A "resource" is "something that can be accessed", like a repository in GitClub. Users may or may not be able to read or make changes to a repository.
What are Relationships?
Think about the following scenarios:
Users can delete comments theycreated
You can read an issue if you are a contributor of the parent repository.
You are a repository contributor if you belong to a team, and the team has the contributor role
In all of these cases, we are describing authorization logic by describing the relationships between the objects. You can tell these are relationships by imagining there’s an arrow going from one object to another:
Examples of relationships
We have a few different relationship types here. The first is a “created by” relationship between a comment and a user. The second is a parent/child relationship between an issue and a repository. And the final is a group structure: users belonging to teams.
With ReBAC, you’ll leverage these relationships to structure your application’s authorization.
Relationship-Based Access Control (ReBAC) Versus Attribute-Based Access Control (ABAC)
The hierarchy of roles, relationships, and attributes
People often talk about role-based access control (RBAC) and attribute-based access control (ABAC), as the two main models for authorization. As discussed in Chapter III, ABAC refers to a general model of authorization logic that uses attributes about the actor and the resource.
If you’re thinking this sounds pretty broad, you are absolutely right. Almost anything can be considered an attribute. For one, RBAC is a subset of ABAC — a role is a form of attribute. But many of the use cases from previous chapters and this one blur the line between roles and attributes. These are often best described as relationships.
Relationship-based access control (ReBAC) is also a subset of ABAC. We might think of this as somewhere between RBAC and ABAC, since roles are a form of relationship. Learning about relationship-based access is a natural next step after roles, and will help lead us into attributes later.
Ultimately, attributes cover more beyond roles and relationships. Take something as simple as: anybody can read a repository if it is marked “public”. The “public” attribute is an example of an attribute that isn’t a relationship.
Although relationship models don’t fully cover all ABAC use cases, they cover a lot of the interesting ones. Let’s dive in and see how.
2. Modeling Relationship-Based Access Control (ReBAC)
As a reminder: authorization models can lend structure to the implementation and thinking around authorization in your application. Getting the authorization model right usually leads to an intuitive and satisfying user experience.
So when thinking about the scenarios from earlier:
Users can delete comments theycreated.
You can read an issue if you are a contributor to the parent repository.
You are a repository contributor if you belong to a team, and the team has the contributor role.
Authorization models work best when they mirror how we naturally express these scenarios. That is what thinking about these as relationships buys you.
As we get into the implementation details, it may strike you that these look just like how we implemented roles. Great observation, future you! We’ve said that roles are a kind of relationship, so it’s natural to start seeing parallels like these.
The lines between different authorization paradigms get a bit blurry, and we’ll point out the differences along the way. Part of the difference comes down to user experience and the mental model. For example, does it make sense to allow users to define their own relationships? Probably not. But user-defined roles make sense. Or should we have a concept of ownership as well as a concept of roles? It’s better to stick to either ownership or roles, but they each have their own time and place. We’ll discuss questions like these in more detail as they come up.
Data Ownership Authorization Model
Back at GitClub, we’ve hit a feature request that doesn’t fit into the role-based model that we shipped last time. Users want to be able to close issues they’ve opened. We made it possible for users to create and read issues based only on what permissions they had for the repository. Closing an issue you opened requires that the authorization decision treats you as more than just your role.
What is the authorization model?
Many applications have a concept of data ownership. For example, most applications allow users to modify their own profile and settings, but not those for other users. We describe this as a user owning their data (whether users truly own their data is a different question).
Similarly, when a user writes a comment or opens an issue, they are the owner of those pieces of data, which grants more permissions to the owner.
How to implement the model?
One of the best aspects of using relationships to model authorization is that you can often use data that already exists in the application.
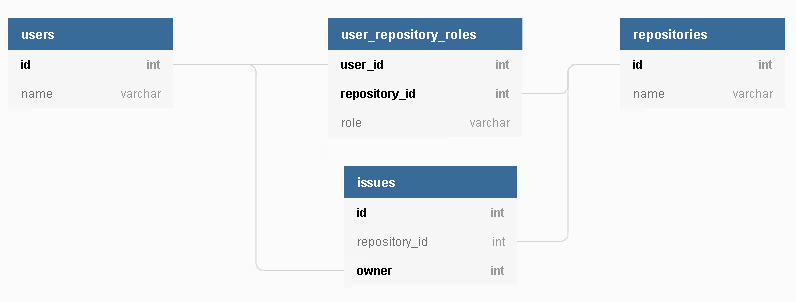
Database structure for GitClub issue ownership
When a user opens an issue, you will likely want to store that information in an issues table, with an owner field. Congratulations, you have your relationship model!
In all seriousness, the challenge here is not in how to structure the data — rather, it’s knowing when to apply this versus defining an “owner” role and associating the user with that role. We also have to decide how to represent the authorization logic, and how to combine that with our existing roles logic.
For example, we still want to allow repository maintainers to close issues. And we might not want issue owners to tag the issue, or assign a user to the issue. First, we need to resolve the role-based access check, then checkfor relationship-based access.
Authorization decision flow for issue ownership
When to use this model?
Data ownership is a great model to use any time you find yourself expressing a permission as “a user should be able to ___ their own ****___''. For example: delete their own issues, read their own profile, or edit their own pull requests.
The data ownership model makes a great complement to an existing role-based model, since it often encapsulates logic that doesn’t naturally fit into the role model.
Let’s look at how this same feature would work using only roles. Instead of using the submitter/issue data, we could instead make sure that every issue has a role. First, we assign the person who made the issue the “owner” role by default. Everybody else defaults to a “viewer”. Finally, repository maintainers also have the “owner” role for an issue. But would we ever expect to explicitly assign somebody a role for an issue? Not in this application. Perhaps in the future we want to allow maintainers to assign a user to a “triage” role for the issue, and that grants them permission to close the issue. But in GitClub, we don’t have such a use case.
That right there is the important observation! There is a ton of overlap between roles and relationships, so differentiating between the two is tricky. But adding roles to issues so that it’s easier to implement the authorization seems like the tail wagging the dog. The natural way of expressing issue owners along with repository roles is sufficient to express the authorization model we need.
Finally, for a specific resource type, use exactly one of roles or relationships. It’s fine if a role permission affects a resource that has a relationship permission model, like in the diagram above, but don’t do the exact same thing in two different ways. That’s a recipe for confusing users! For instance, when someone undergoes a permissions change (like ceasing to be the owner of a resource), they should expect that their access changes to match. Plus, you (as the programmer) shouldn’t need to coordinate both a role and ownership change at every access point.
Authorization with Parent-Child Resources
There is a pattern we’ve used a few times both here and in Chapter III that we intentionally smoothed over in order to avoid introducing too many new abstractions at once. We’re sorry for betraying your trust and withholding this information.
The pattern we’re talking about is how to use the permissions a user has for an organization or repository to grant access to an issue or a comment nested within that organization or repository. In particular, it’s not sufficient to say “repository contributors can close issues” — instead, you need the fully-qualified version: “repository contributors can close issues that belong to the repository”.
What is the authorization model?
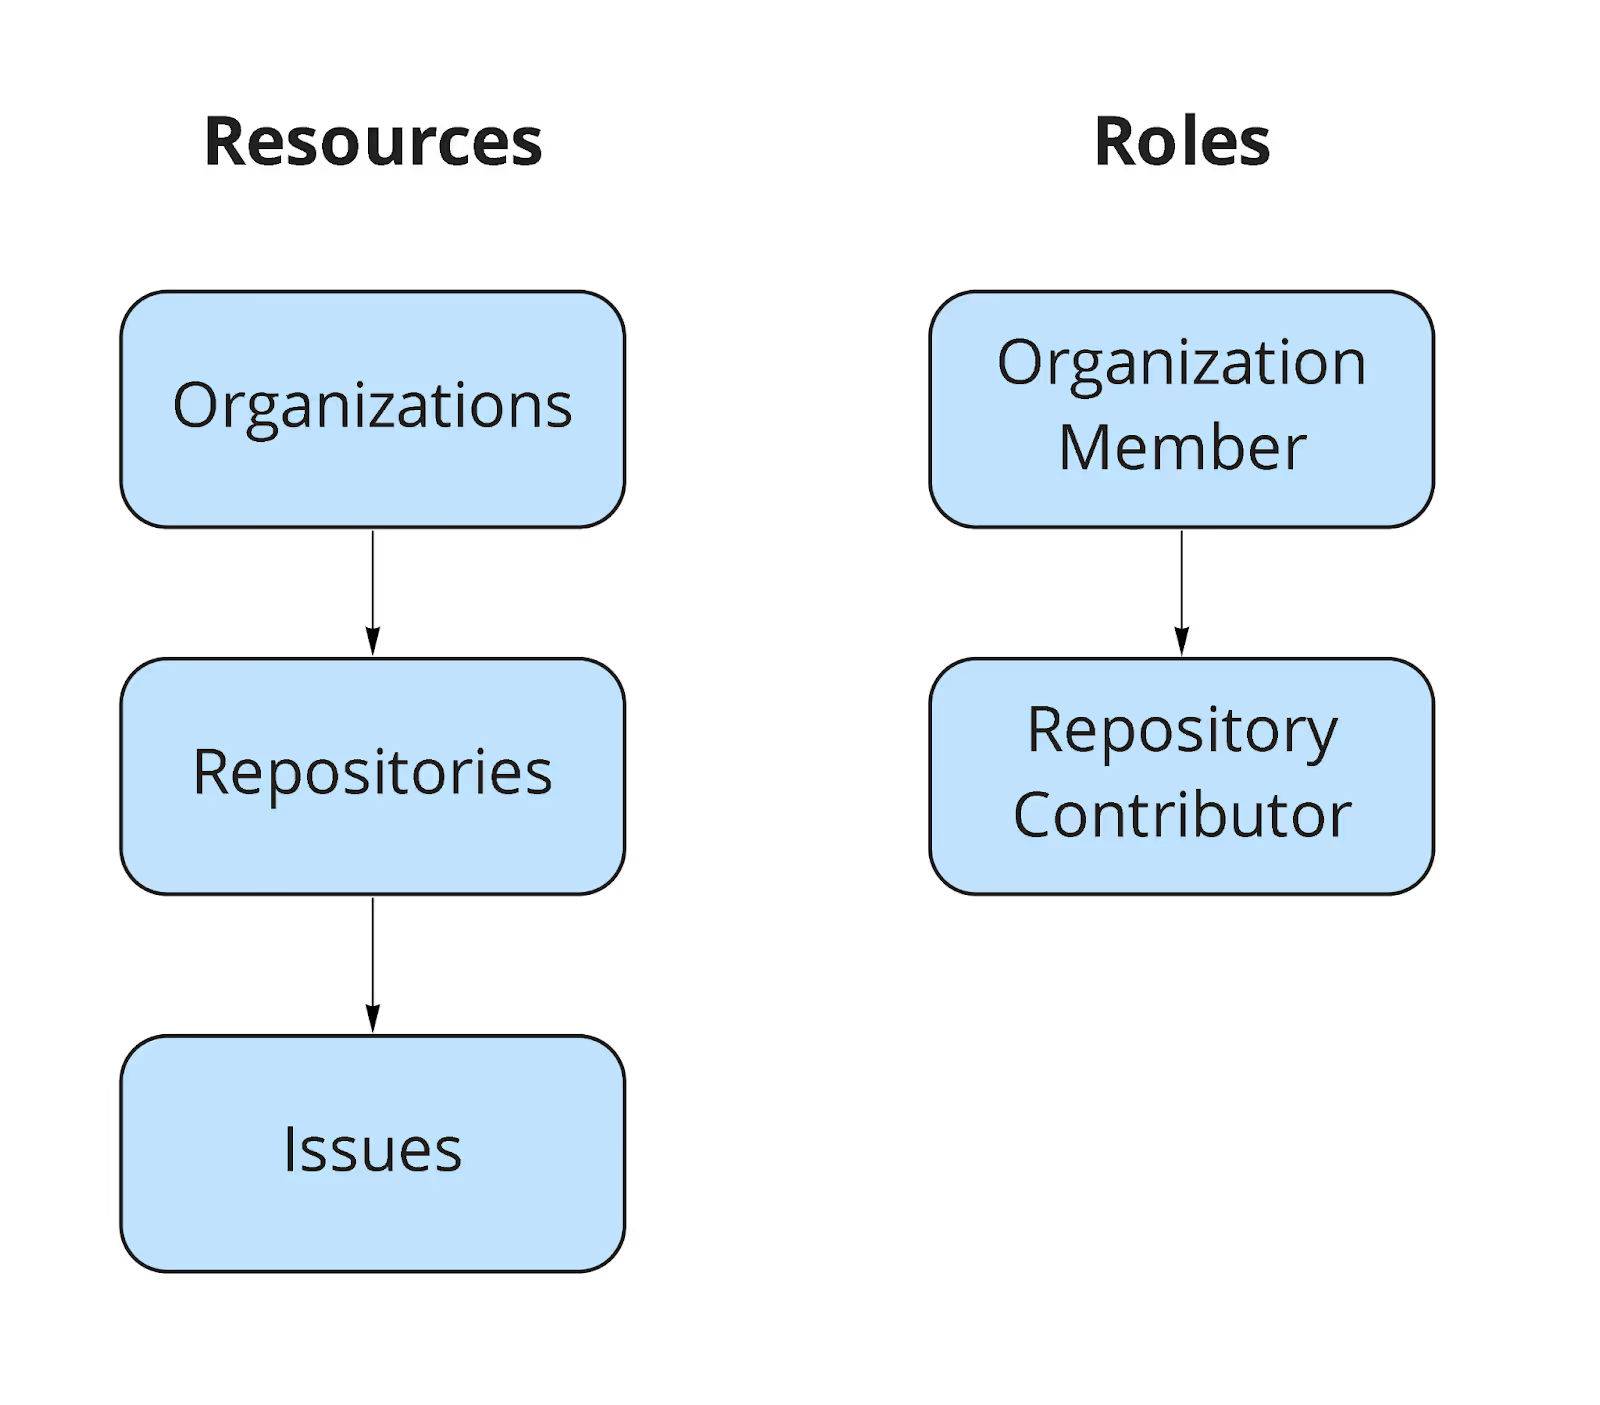
Issues belonging to repositories, repositories belonging to organizations. Mapping organization roles to repository roles. These are all examples of parent-child resources — our next kind of relationship.
Examples of parent-child relationships
The general idea is to grant a user or role permission on all children of a specific resource. This is such a common concept that you may not have even thought about it as needing a specific name.
The difference is between asking “is the user allowed to read this issue” and “is the user allowed to read issues on this repository”. We often need to be able to resolve both. The data ownership pattern we just saw is as granular as a single resource. A role, on the other hand, might grant access to all issues in a repository.
By formulating the authorization logic using parent-child relationships we are able to handle both. First we check if the user has direct access, and if not, we check whether the user has access via the parent.
How to implement the model?
Once again, you can use the data model you already have to implement the authorization model. There’s no trick here — relationship-based access control is motivated by leveraging data structures that already exist in your application. This chapter is to help you to identify what those are, and how to use them for authorization.
Database structure for parent-child relationships
In GitClub, issues belong to repositories, and this is encoded through the many-to-one relationship between issues and repositories. The repository_id column on the issues table stores that data.
The authorization logic is represented in the flowchart below. The general idea is to first check whether the actor is allowed to perform the action on the resource — whether via a role, or relationship — and if that fails, check to see if the actor is allowed to perform the more general action on the parent resource.
Authorization decision flow for parent-child resources
For example, suppose we want to check whether the user can delete an issue.
Check if the user has permission directly. In this case, there is only one possibility: check if the user is the issue owner.
If that fails, check whether the user has permission on the parent resource, i.e. do they have permission to delete any issue belonging to the parent repository?
While staring at the above diagram, you might be thinking, “What did I get myself into?” You started with organizations, repositories, and issues, but now you’re looking at triply-nested flowcharts.
The reality is that these are all super common authorization scenarios. But while each piece individually is easy to reason about, the interaction and composition starts to lead to some complex logic.
In the above flowchart, we’ve pushed our graphical abilities to their limit to bring you something consumable to represent the logical flow. But we haven’t covered all possible combinations. For example, we used parent-child implied roles in the previous chapter when we said “organization admins are repository maintainers.”
We’ll revisit how to manage this complexity at the end of this section.
When to use this model?
You will almost certainly be using this model whether you explicitly choose to or not. So embrace it! Keep it in mind next time you are adding permissions to a role that says, “organization admins are allowed to edit tasks,” that you may actually have a parent-child relationship. Keep in mind that when checking who can edit a task that you may need to check whether someone has direct permission (they created the task) or from a parent resource (admin of the parent organization).
However, avoid using both parent-child resource permissions along with roles on the child resource. Doing so can result in too many distinct ways to have access to the same resource.
We already have repository roles, so we should not allow repository permissions to be defined on organization roles. Doing so results in too many possibilities for allowing a request. The outcome of this is usually either a confusing user experience, an error-prone implementation, or both. Prefer instead to have parent-child implied roles. A parent-child implied role pattern says that if a user has “Role X” on a parent resource then this implies they also have “Role Y” on the child resource.
For example, if you want all organization members to be able to read repositories. Then instead make organization members have an implied role of repository guest. This grants them a certain base level of permission, but makes it clear what actions you can take as an organization member in a repository.
User Groups authorization model
Imagine GitClub is a roaring success, and we have larger organizations joining all the time. However, some organizations struggle to manage all of their users. There are just too many individual roles to manage. What they really want is teams. They already organize their engineers by team, so it would be natural for them to use similar structures to group users and assign them permissions.
What is the authorization model?
Dividing users into groups is a natural way to deal with growing numbers, and many product teams find themselves adding groups as they attract larger customers.
User groups are structurally very similar to parent-child resource relationships. However, instead of resources belonging to other resources, we have users belonging to groups. From there, we need to decide how groups affect their members’ permissions.
Groups don’t inherently have a related authorization meaning. Much like users, groups need to be assigned permissions. Deciding what kind of authorization model to use with groups follows the exact same thought process as for users. Hopefully, there is already a clear need for groups in the application, and you use those to drive the design. For GitClub, the goal is to control access repositories based on membership in a team. For users we use roles to determine this, so we should use roles for teams too.
How to implement the model?
There are two core parts to the user groups data model. First is the implementation of the groups themselves. Depending on the use case you might want the user to belong to multiple groups. If your groups represent departments at a company, perhaps one group assignment per user is enough. For GitClub, users can belong to multiple teams.
The second part is the data that grants access. We’re using roles for this, so our data model will have roles between teams and repositories.
Database structure for user groups
We’ll save you from another flowchart. The general idea is the same as in the parent-child diagram
Check whether the user has the relevant permission (whether by role, owner relationship, or on the parent).
For each group the user belongs to, you check whether the group has permission.
When to use this model?
User groups are a great way to empower your end users to organize their permissions with a little more structure. We showed one variant here where users were grouped together and then permissions were assigned to those groups via roles.
Other similar relationship variants exist that all fall into the same patterns. For example, you might add a number of issues to a shared project. Also, you might assign users to a project. This is using both parent-child and groups simultaneously. An issue would have a parent project, and users belong to a project, much like with groups. In this case, we would combine the two access control models: a user can edit issues that belong to a project if they also belong to the project.
Hierarchies, aka “Recursive Relationships”
On one sunny summer’s day at GitClub, everything was going great. Until the news came in: Customer $large_co wants to use GitClub teams to mirror their organization structure and provide access to different repositories based on what team a user belongs to. That sounds great until we realise it means supporting nested teams — something we haven’t seen until now.
What is the authorization model?
There are a few instances where relationships become recursive.
Although this pattern isn’t as widespread as some of the other ones we’ve covered so far, hierarchies turn up in a bunch of different scenarios. One common example is anything that needs to handle organization hierarchies. This could be related to HR, payroll, expenses, things like that. The authorization logic that accompanies these is of the form: “managers can approve expenses for employees they manage,” where managers themselves can have managers.
Another case for this is anything that resembles a filesystem. In applications like Google Drive, you can grant access to users on a folder, and they will automatically be granted access to any files or subfolders contained within the folder.
How to implement the model?
This is probably a familiar refrain by now — we have already seen most of the pieces we need to implement this model. We’ll extend our previous model so that teams have parent teams.
Database structure for recursive relationships
The high-level authorization logic is the same as in the parent-child resource and group scenarios. However, the main difference is that we now have recursive relationships. A good way to handle this recursion is by using database support for fetching all nested teams for a user/repository in one go. By doing this, you avoid needing to hit the database multiple times as you check each team for the required permissions.
When to use this model?
If you don’t have any hierarchical data in your application, you can safely move on and forget you ever read this section.
But in the case where you do have hierarchies, can you avoid handling recursive data structures for authorization decisions?
That’s only possible if the resources that are in a hierarchy don’t need to evaluate the permissions for all parents. For example, suppose we add threaded comments to GitClub. A row in the comments table might have both a “parent_comment_id” and a “root_comment_id”. In that case, we can still perform the “users can edit comments for repositories that they maintain” by tracing from comment to root comment to repository, using the parent-child relationship model. Look for similar opportunities if you want to avoid the complexity of hierarchies.
Implementing The Logic Of Relationship-Based Access Control
Each of our example relationships have a relatively simple data model. In most cases we are using the application data directly. However, the different permutations and combinations of relationships and rules was slowly turning our flowcharts into pieces of abstract art.
We’re building Oso to make it easy to express and combine these types of relationships into a consistent authorization model. Our approach is to use a centralized policy to express logic over the relationships that already exist in your application. And the policy language lets you combine those relationships together into the full authorization logic. For example, you can define roles and relationships and use these pieces together to define the composite models for parent-child permissions and implied roles that we covered earlier in the section. This lets you focus on the what instead of needing to work out how to solve the how. If you’re interested in learning more, a good place to start is theOso documentation on ReBAC authorization patterns.
3. One ReBAC To Rule Them All?
Looking back, we’ve now covered about half a dozen authorization models, including roles and relationships. All of these have been based on using existing data models in the application, perhaps adding roles where necessary.
With this setup, all the authorization data coexists with application data. In fact, most of the authorization data is application data, and the challenge is primarily how to make authorization decisions using those inputs.
An alternative approach is to take all of those relationships and centralize them into a single data model. This lets you adopt the centralized authorization architecture we discussed in Chapter II. The benefit of this is that you can add and update authorization logic independently from your application. But it comes at a severe cost — now all application data needs to go through this one central model.
Centralized Relationship Data
All relationships that we have covered so far can be expressed as a triple of data:
Who/what is the source of the relationship
Who/what is the target of the relationship
What is the relationship between the source and target
In this relationship “Alice is the owner of issue #412”, the source of the relationship is Alice, the relationship is “owner”, and the target of the relationship is issue #412.
This triple of data is the start of our centralized data model.
You can picture this data as a graph. A simple version has nodes corresponding to sources and targets, and relations indicated by edges.
Data relationships between resources at GitClub
Suppose we want to evaluate the query: is Alice allowed to edit the Anvil repository? We first find all relationships Alice has with the repository. We can now do this by walking over the graph, and finding all paths.
The data we have represented in the above graph is:
(Alice, admin, Acme)
(Acme, parent, Anvil)
(Anvil, parent, issue #412)
(Bob, guest, Anvil)
(Alice, owner, issue #412)
We start with any relationship whose source is Alice, and traverse from source to target:
Alice -> admin of Acme
Acme -> parent of Anvil
Therefore, given the rule “organization admins are repository maintainers” Alice is a maintainer of the Anvil repository
In our centralized service, we might use a single “relations” table to store the data triples. As an example:
Database structure for centralized relationship data
This schema diagram is a very rough example of how the data might be structured. But it highlights the most important point: we no longer store relationship information directly on the data models. In order to do common tasks like list all repositories in an organization, the application needs to consult the relations table.
However, this data model alone isn’t sufficient to capture relationship-based access control in a centralized model. You need additional authorization logic on top.
For example, we know that organization admins are also organization members. We don’t want to represent all of this logic statically by inserting the appropriate entries into the table. Instead we should be able to evaluate the existing relationship data along with our dynamic rules.
Implementing this logic is a little more constrained than what we have earlier in the chapter. We no longer need to know how to check whether a repository belongs to an organization — we just look for the organization-repository “owner” relationship in the database. This makes one part of the authorization logic easier: we know how to access the data. But you still need to figure out how to write the logic to combine the relationships together to build the overall authorization model.
A Real-World Centralized ReBAC System: Google Zanzibar
One example of the centralized data model in the wild isGoogle Zanzibar. First presented at USENIX ATC in 2019, Zanzibar is Google’s approach to authorization for services like Cloud, Drive, and YouTube — it’s used for virtually all authorization at Google.
There are two key contributions from the Zanzibar paper. First is an example implementation of the relationship-based authorization model. The second is how they were able to make Zanzibar work at Google’s scale.
Zanzibar’s relationship model is made up of two main pieces: relationship tuples and namespace configurations. These represent authorization data and logic respectively.
The relationship tuples are equivalent to the data triples we saw earlier. The namespace configuration captures information like:
There are document owners, editors, and viewers. Users can be directly assigned to any of these relations (roles).
Document owners are document editors. And document editors are document viewers.
Users who are editors of the document’s parent are also editors of the document.
The combination of relationship tuples and namespace configuration is a fantastic way to structure authorization. And the entire model proposed in the Zanzibar was very influential to this author and many others.
However, it has to be said that the most impressive part of Zanzibar is the infrastructure required to make it work at Google scale.
To put some numbers behind the magic words “Google scale”. As of the 2019 paper:
Hundreds of applications
More than 2 trillion relation tuples that occupy close to 100 terabytes
10 million client queries per second
To manage this load, Google deploys more than 10,000 servers to handle the requests, and the data itself is stored in Google’s distributed SQL database,Spanner.
If you'd like to look at Zanzibar in more detail, we collaborated with one of Zanzibar's authors on Building Zanzibar From Scratch. As the name suggests, that post covers Zanzibar in deep detail.
When To Use Centralized Relationships
The main benefit you get from the centralized relationships model is it makes it possible to manage authorization centrally. This means that development teams can create new applications and add new relationships without needing to update any application code.
However, the downside is that you are constraining your application to use a very specific data model and you need to design your application around that data store.
For this reason, we don’t recommend using the centralized relationship model in general.
To repeat the same refrain from throughout this chapter: build authorization around your application, not the other way around. What this means is that when you are hitting data scaling issues and are considering centralizing parts of your data architecture, that’s a great time to consider consolidating your authorization model.
We’ve found that there’s really only a handful of relationships that matter. We’ve covered those in the previous two chapters: roles, data ownership, parent-child resources, and groups.
If you want to benefit from having a consistent relationship-based authorization model, then we recommend you use something like Oso, which makes it easy to express authorization using relationships over your existing data models.
4. The Golden Rule: Build Authorization Around Your Application
Relationships are a core concept that show up naturally in many applications — not just for authorization. Previously, we saw the varieties of role-based authorization schemes and how to use them. With relationships, the challenge is recognizing when the relevant data exists in your app, and how to leverage it for authorization.
We went through several examples of relationships and how to implement them using your existing application data models. An alternative approach is to centralize all relationships data like in the case of Google Zanzibar. Although this makes it possible to build a consistent authorization model, the cost is that you’re required to dramatically re-architect your application. This breaks our golden rule: build authorization around your application, not the other way around. We recommend sticking with the application data model.
As we wrote in earlier chapters, we encourage you to join the community of developers in theOso Slack! We'd love to talk about what you're working on and answer any questions you may have. If you want to kickstart the process of building authorization into your application, you can useOso and learn more about it in theOso documentation.