The fundamentals of authorization are encapsulated in this single snippet:
These six lines contain the three core components of authorization:
- The code if not user.admin? implements the rules: "you must be an admin to update this post"
- The admin boolean on the user object is the data we use for the rules.
- Everything within the if statement is the enforcement of the authorization.
This is Part 3 of our 5-part series on Why Authorization is Hard. Today, we’re talking about data.
Part 1: Why Authorization is Hard
Part 2: Authorization Rules are Always Harder than you Think
Part 3: The Venn Diagram of Authorization Data
Part 4: Why Enforcement is Hard
Part 5: Why Opinion Is the Answer to Complexity
The data in the code snippet at the top shows simple authorization data. Our user object and our admin boolean determine who gets access.
But authorization data isn't always this straightforward. First, as your application matures you need different types of authorization data—more granular roles, resource data, and membership data, for instance.
Second, what’s the difference between authorization data and application data? The answer is: there’s overlap. This second issue—the overlap of application and authorization data—complicates our options for handling authorization data.
There’s no easy answer, and the best answer changes as your application matures.
The Intersection of Application and Authorization Data
You think you have the following:
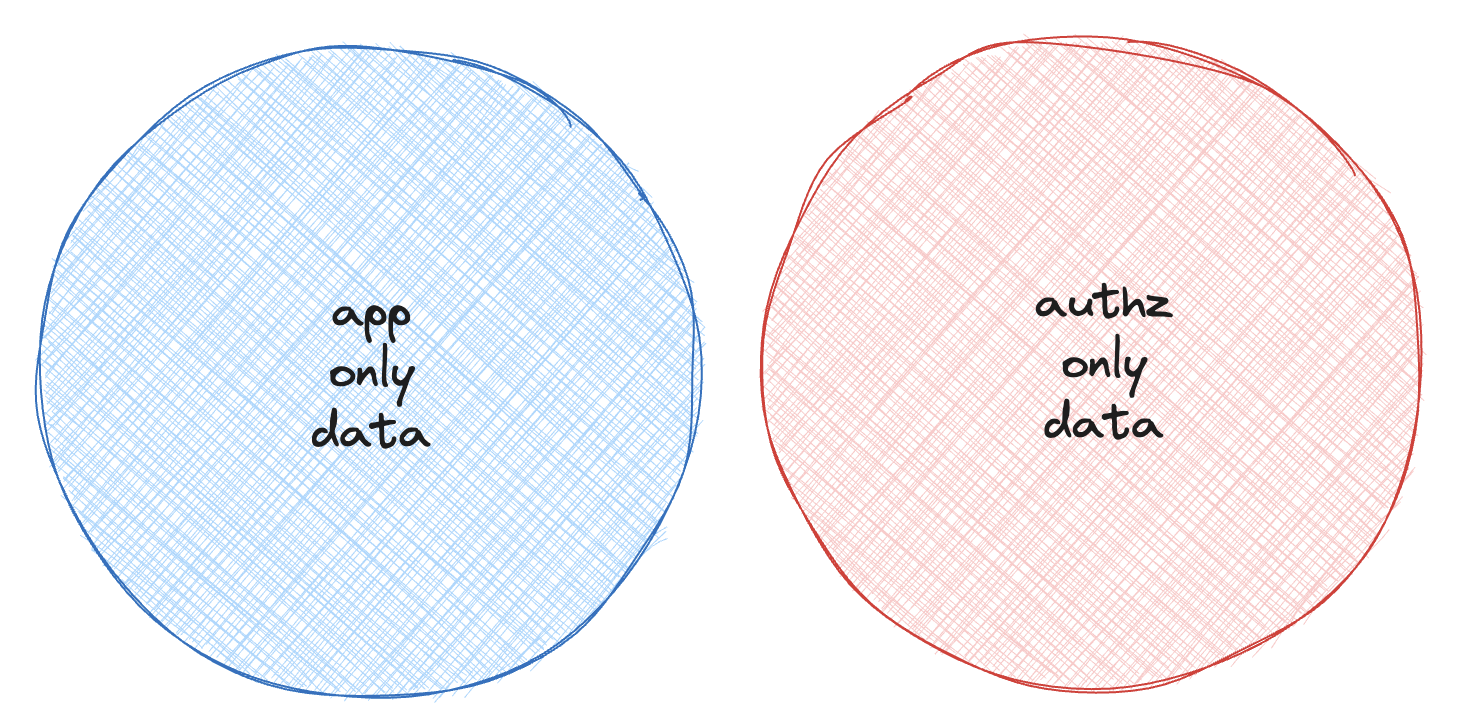
Nicely uncoupled data for your application and authorization.
Actually, you have:
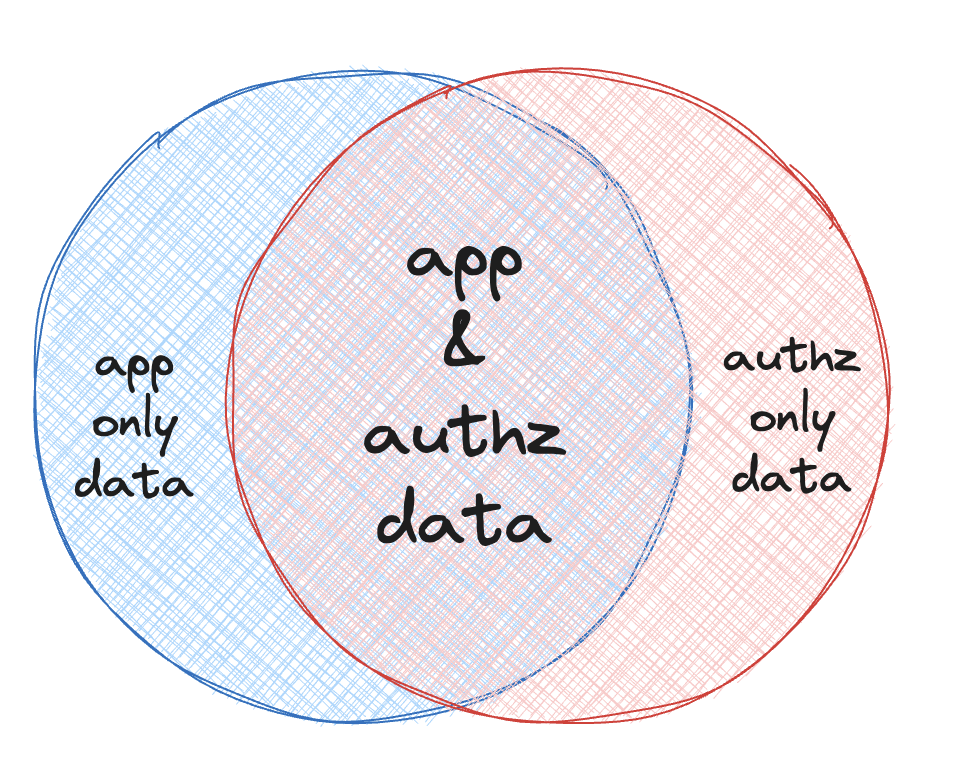
Some data is only for your core application, some data is only for authorization, but a lot of data that spans both. And this span grows.
You use some data only for the application. The content of this blog post is a good example of data that you won’t use for making an authorization decision. You use some data solely (or primarily) for authorization, like the admin boolean from the beginning.
But in a lot of cases, there’s overlap. You use data for both authorization and non-authorization purposes. Let’s say you have a source control application, GitCloud. You might have organization as the top-level resource, then repositories, then folders and files. Users have roles and memberships, and permissions based on their roles and memberships.
You use all this data for authorization. For instance, a user might have access to a file because she has access to the file’s parent repo. This relationship between a repo and a file also serves as application data. We might want to move files within a repo, or move repos from a user to an organization. For both application and authorization purposes, the application must understand how the file relates to the repo or how the repo relates to the organization.
This is where it gets difficult. You have to think about:
- Storing the data—should your authorization data live with application data, or in a separate service?
- Accessing the data—if the data is separated, how do you bring it together to make the authorization decision?
- Modeling the data—if authorization data and application data can be the same, how do you find the right format (i.e., data model) that fits all use-cases?
Here we go through each of these decision points and the solution spaces.
Storing the Data
So where does this data go?
Note: in this post we focus on how this problem shakes out in microservices architectures (as opposed to monoliths). The rationale is that this is the problem we hear engineers scream loudest about, and well, covering monoliths too would have made the post twice as long. Feel free to scream back at us if you want to see a similar post on monoliths.
There are three main microservice authorization patterns for storing authorization data:
- Leave all data where it is, and let services directly request it from each other.
- Use a gateway that attaches relevant authorization data to each request.
- Store the data in a central authorization service.
1. Leaving the data where it is
Teams start here because it's the natural option. Each service manages its permissions, and they interact through APIs to get roles and permissions data.
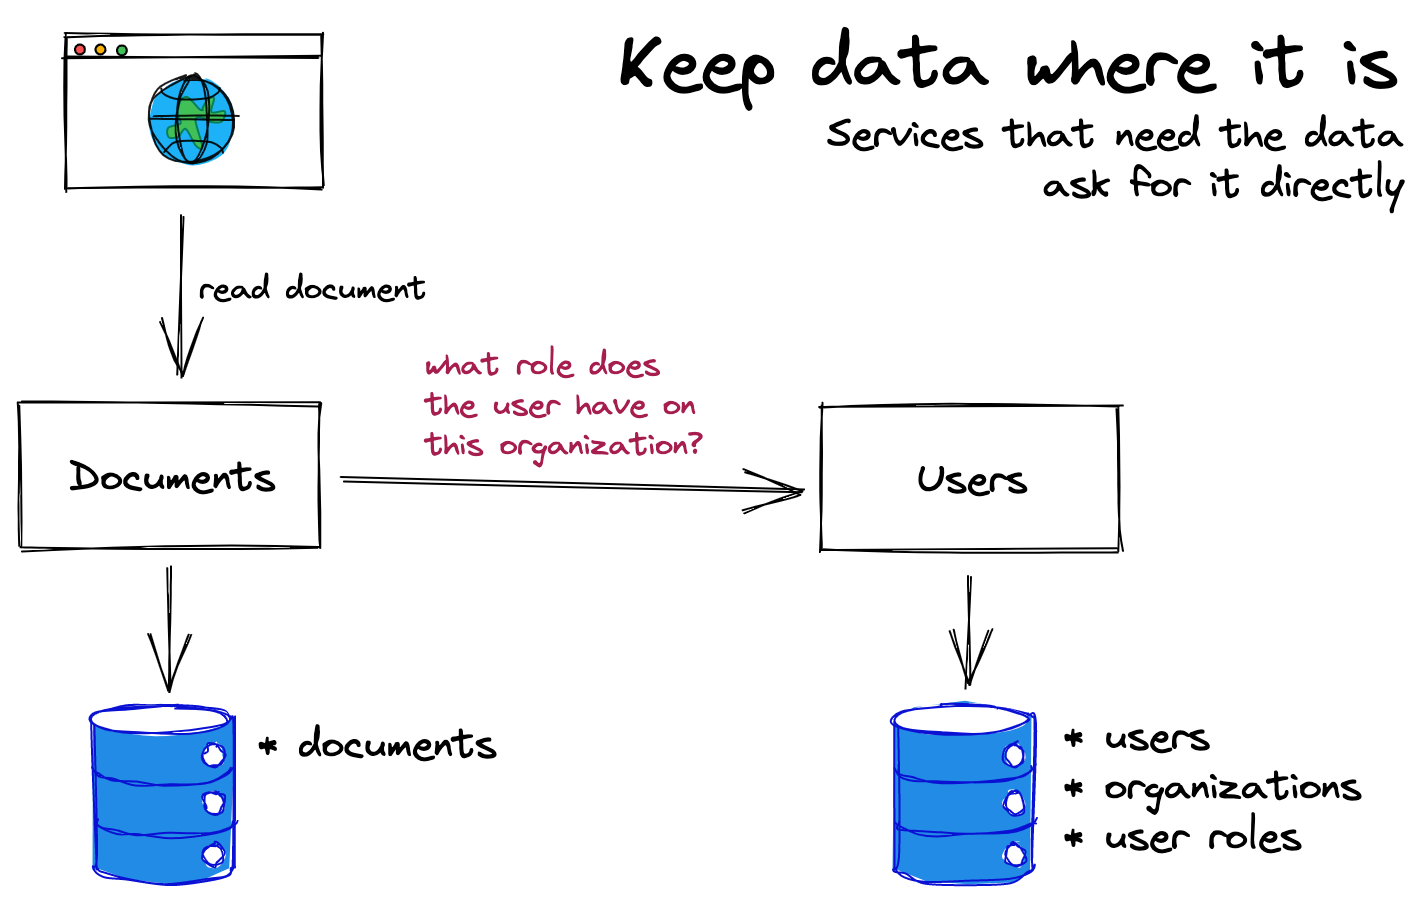
The benefits are that it's simple, it works for low-complexity systems, and there’s no need for extra infrastructure.
The drawbacks are that it doesn't scale well. As you increase the number of services or overall complexity of the application, this option breaks down because you need a lot of intra-service requests to make your authorization checks. This leads to latency and performance issues. This approach also makes it challenging to iterate on and debug your system, because you have authorization logic and data spread all over the place. A change in one place can cause a ripple effect down the line. Similarly, understanding why something is misbehaving involves stitching together all that code and data to get the full picture of a single request. Make sure you have great tracing!
2. Use a gateway
In this option, a gateway acts as an initial step in the request pipeline, which adds authorization data to every request before the request hits downstream services.
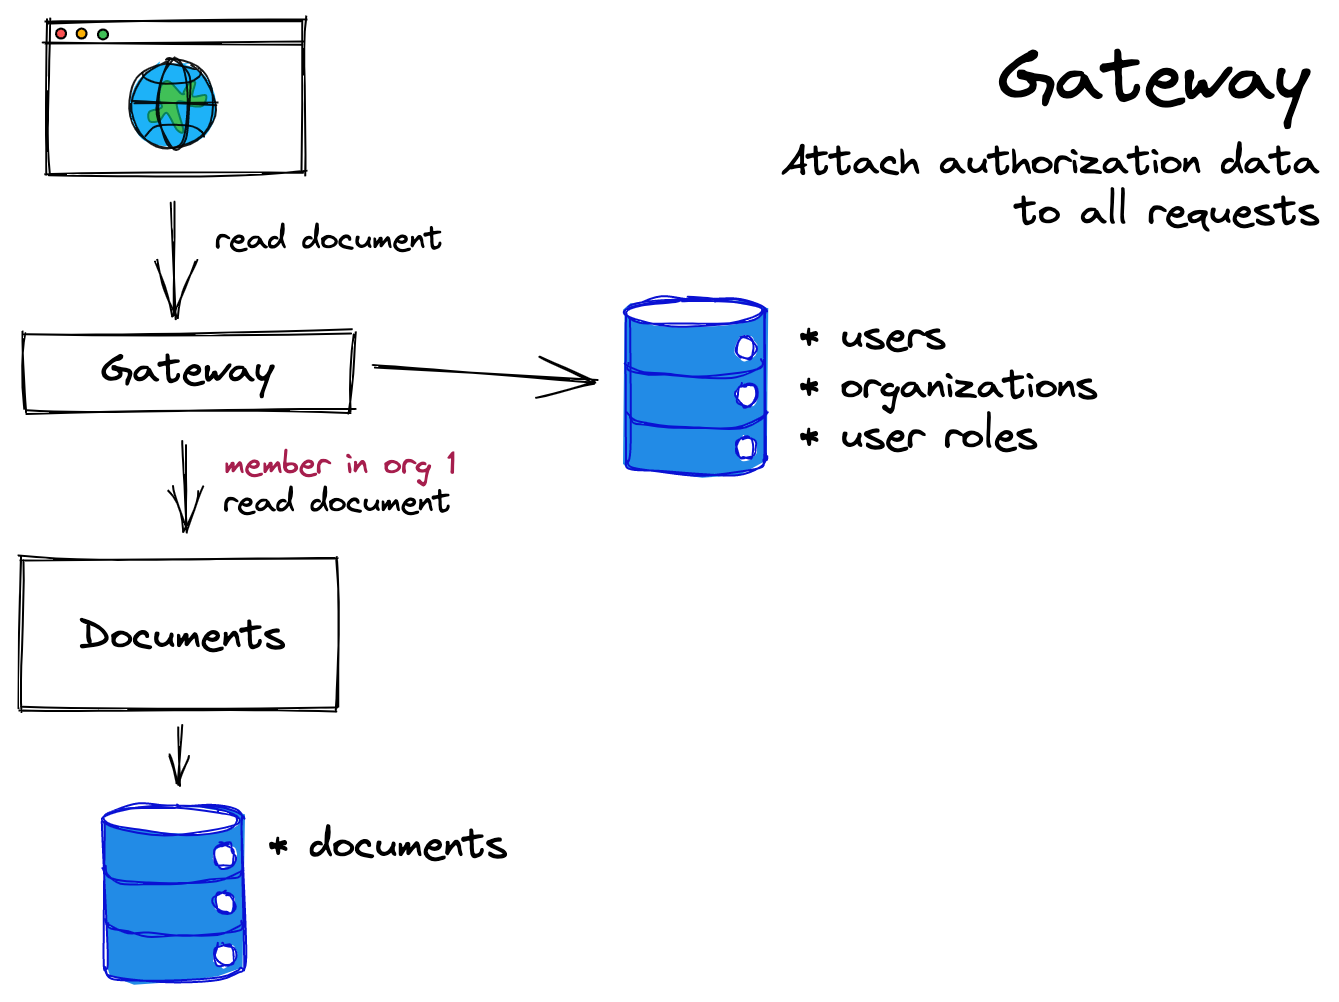
The benefits are that these downstream services don't have to verify the origin of the authorization data since it always accompanies the request with the authentication data. This approach significantly reduces the complications of internal API calls and the round trips required to gather all the authorization data.
But as your service matures and you move to resource-specific permissions (e.g., Bob is an owner of this repo but not that repo), you quickly end up with too much data to fit on the token. In the GitCloud scenario, if you had to store every user's role for every issue in every repo she belonged to, every token would balloon in size, and the latency for every data attachment request would go through the roof. You would also hit explicit token size limits, at which point you have no choice but to consider the third option.
3. Use a central authorization service
The third option is to centralize all authorization data in a dedicated authorization service. This service then acts as a hub for authorization data.
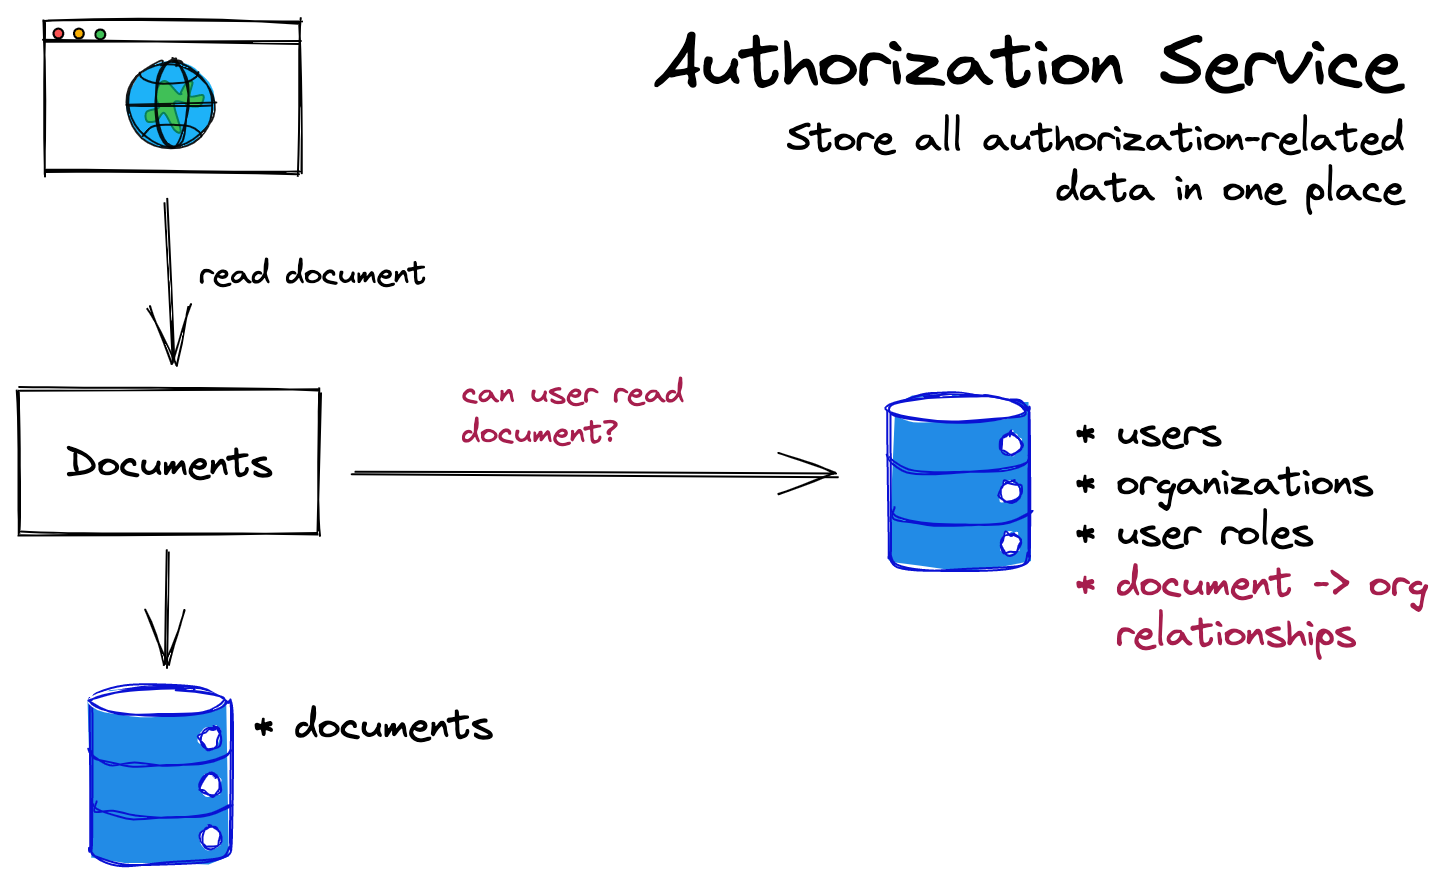
In this setup, services don’t get involved in authorization. When these services need authorization checks, they call the centralized authorization service. This fits with the philosophy of microservices and separation of concerns. More pragmatically it means:
- You can optimize each service for its purpose. Optimize your application data for application calls; optimize your authorization data for authorization calls.
- This setup streamlines the development process. Teams dedicated to different functions focus only on their services and how they need to interact with the authorization service. The authorization team can also work more quickly, as they have a contained service to work on.
The drawback is complexity. When you deploy a service to secure every request, you better ensure that service is up all the time and can respond fast. More importantly, authorization data is now supposed to live in one place…but as shown in the Venn Diagrams above, you need at least some of that data both for authorization and to make other parts of the application work. How do you resolve this? More on this in the following section, Accessing the Data.
Choosing storage
If you have a simple use case – e.g., just that admin boolean on the user object – then you should choose the path of least resistance. At this point, focus your authorization on getting something that works for your product. So choose Option 1 and leave your data where it is.
If you are farther along and have set up a gateway and logic for token enrichment, then you can also keep moving down that path. Again, gateways are good when authorization data is simple. If each user has a single role within an organization, then you are only appending a small amount of data to each request.
But these only work when you are at level one of the authorization maturity model:
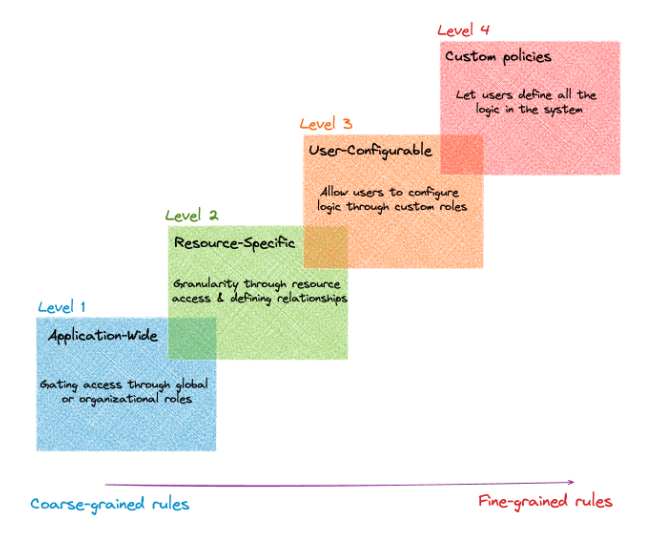
If and when you move beyond level one in the authorization maturity model, all roads lead to the authorization service.
This is where we get deep into the challenges presented by the Venn diagram. When your authorization data is straightforward and distinct from application data, establishing an authorization service is straightforward. But that’s rarely the case. Now you have to decide the how, what, and where of getting access to the data to make authorization decisions.
Accessing the Data
Here again, you have three options:
- You synchronize the data between application services and the central authorization services so the relevant data is in both places.
- Each application service sends any service-specific data to the authorization service on-demand, on every request. The authorization service applies your rules to all the data in the request, and sends back an authorization decision.
- Each application service fetches shared authorization data from the authorization service, combines it with its service-specific data, applies your rules, and generates an authorization decision.
1. Synchronize the data
In this first option, you keep all the data in all your application services and the authorization service. There are a few ways of doing this:
- You can perform dual writes to the application service and authorization service using two-phase commits (2PCs).
- You can replicate data from the application service to the central authorization service.
- You can designate the central authorization service the system of record, and replicate it back to the application service.
This last option is how Google uses Zanzibar. When implementing authorization with Zanzibar, it becomes the system of record for any data used for authorization.
The Pros and Cons
The benefits are:
- The authorization service has both the logic and the data, which is everything it needs to make an authorization decision. Hooray.
- You have authorization logic in only one place, the authorization service. One fewer thing to keep track of.
The cons are:
- Well, in all of the various sync options above, you have two copies of the data, which is of course every developer’s dream, right? Wrong. Synchronizing data reliably is difficult. If you are using the 2PC protocol, you can run into latency issues and blocking issues, and you have to account for common failure cases, such as one-commit fails. Replicating data can lead to consistency issues, conflict issues, higher resource costs, and the need for reconciliation checks.
2. Send the data on-demand
In the second option, you send any additional, service-specific data along with authorization requests to the central service.
In GitCloud, the central authorization service might store roles and permissions on an Org level. To find out whether a user can access a given repo, the Repo service might send repo-specific permissions data to the central service along with its request. The central service then combines that data with its central, shared Org-level data to make the authorization decision.
The Pros and Cons
The benefits are:
- All the data lives in just one place. Shared authorization stays in the central service. And each service keeps its service-specific authorization data. No syncing!
- All the authorization logic lives in one place too. You can log, debug and refactor everything in your central service (mostly…see cons below).
The cons are:
- When sending service-specific data on-demand, the central service only has part of the jigsaw at any given point. This makes it harder to debug and iterate on your code – e.g., if you got the wrong authorization decision, why did that happen? Was it missing some authorization data? If so, was the central service supposed to have it? Was the application service supposed to send it? And so on.
- Every developer writing new code needs to remember when they need to include authorization data as part of their requests.
3. Fetch the data on-demand
This option is similar to the prior one. The difference between them has to do with where the authorization logic lives, and where the work happens of actually evaluating your rules against your authorization data to render an authorization decision. Whereas in the prior option authorization logic lives in the central authorization service, here that logic lives in each application service. When a service needs to make an authorization decision, it contacts the central authorization service for relevant authorization data only. It then combines that data with any service-specific data it keeps locally to make an authorization decision.
Taking the Repos example above: the central authorization service still stores roles and permissions on an Org level; the Repo service stores repo-specific permissions data. To find out whether a user can access a given repo, the Repo service asks the central service for Org-level data. It then combines that with the repo-specific data it’s keeping locally, and evaluates it against your authorization rules to make an authorization decision.
The Pros and Cons
The benefits are:
- Like in option two, you have just one copy of the data.
The cons are:
- Like in option two, no service has the whole jigsaw at any point.
- Every developer needs to sort out how to combine shared data with service-specific data, and remember to do so throughout the codebase.
- You now have authorization logic spread all over your codebase, across services. As a result, you lose the observability that comes from centralizing logic, logging, and debugging in a single service.
Choosing access
Whereas with storage there is a clear answer, each solution for accessing data has pros and cons. Synchronizing data is a big challenge long term if you’re not Google. Sending data on-demand often makes more sense for most organizations. It is possible to construct more options that are effectively hybrids of the above (🤯) to stitch together a better balance of pros and cons, but they are overwhelmingly complex to build and beyond the scope of this post.
Modeling the Data
The final choice you need to make is the data format itself:
- Relation tuples (i.e., Zanzibar) — Model everything as relationships, and use the data format of “relation tuples.” Great for performance, and makes relationship-based (ReBAC) modeling easier, but forces you to remodel data in awkward ways when it doesn’t align with the ReBAC model. Not familiar to most developers.
- JSON model (e.g., OPA) — All data is in JSON format. Super flexible. Might be fast, might be slow – that work is up to the developer.
- Facts (e.g., Oso) — Model data using a name and a variable number of arguments, called a fact. Flexible and performant, but unfamiliar to most.
Let’s talk through each.
Relation tuples
The grammar for relation tuples defined in the Zanzibar paper is:
You can read more about this format here.
There are a few subtle variations on the format across the many Zanzibar implementations, but the key use cases it supports are:
- <X> has a relation with <Y>
- Alice is a member of group foo: group:foo#member@user:alice
- <X> has a relation with all <Y>s who have a relation with <Z>
- All members of foo are admins of
document 123: document:123#admin@team:foo#member
Regarding performance, Google’s implementation is proof of the ability for this data model to scale. What makes it so fast is that practically all authorization queries are just a bunch of joins between objects of the form type:id. Zanzibar is effectively a cache in front of a highly constrained relational database.
The disadvantage of relation tuples is they force you to model every concept, every piece of data as a relationship. This works well for use cases that naturally feel like relationships, but it is a pain for other use cases. For instance, how do you model attributes on resources? Instead of modeling “resource is public” directly, you have to write that “everyone can have the reader relation” with this resource: document:123#reader@everyone.
JSON
JSON is the opposite–you can do everything with it (except have comments 😉). It is a flexible, unconstrained format that comes with no opinion on how to model the data.
The benefits of using JSON as the data format for authorization data are:
- It’s flexible and can represent ~anything reasonably
- It’s a widely-used and understood data format
- There’s extensive tooling for it
JSON has the opposite problem versus relation tuples. The flexibility has a cost. You’re on the hook for making it fast, so: congratulations, you’re a DBA now too! It’s easy to shoot yourself in the foot and create performance issues; this risk is even greater if you use a flexible DSL for modeling your authorization rules (e.g., OPA). To make a JSON/OPA framework work and ensure you get acceptable performance, you must essentially construct a database to constrain the data, index it as needed, make schema improvements, and do all the fun things DBAs do.
Facts
Facts are a data model for authorization data. The structure of a fact is a name, and a list of arguments. For example, you can represent roles, relationships, and attributes as facts:
Oso is the creator of the fact model. The design goal of facts is to get the performance of relationship tuples with the use case coverage of JSON. When you ask for an authorization check in Oso, under the hood Oso generates a list of facts that would make the authorization request return as true. Oso then scans a fact database for those facts. In practice, this is a few SQL joins over a heavily indexed relational database. And because of the structure of facts, this holds for basically any authorization model and query.
The downside of facts is their novelty. Engineers aren't familiar with the concept, and tooling outside Oso isn't available (yet!).
Choosing formats
Your data format choice boils down to opinion vs flexibility. If you have highly structured data that is mostly relationships, relation tuples could work for you. The flexibility of JSON is appealing for tiny use cases.
Facts sit in the middle. Facts are fast and flexible but not as convenient as JSON.
Choose based on where you are now, and where you want to be
Authorization data comes with nuance. It matters:
- What you’ve already built
- What you’re building out in the future
- Where the intersection sits in the app/authz Venn diagram
- The ability and willingness of your team to build out new services or manage data
But that shouldn’t preclude us from generating some rules of thumb, and indeed it won’t. Here are our best practice recommendations based on discussions with over 1,000 engineering teams and their authorization problems:
- Storing the Data - Use a centralized authorization service. Though you’ll end up with the Venn diagram from the beginning, that’s an inevitable part of the authorization journey. A centralized authorization service lets you focus each service on its primary goal and dedicate resources properly to application and authorization services.
- Accessing the Data - Send application-specific data on-demand. This means you don’t have to worry about syncing data, but you still get the benefits of centralizing your authorization logic. (And you can expect the aforementioned “hybrid-and-beyond-the-scope-of-this-post” option from Oso to make this piece of the equation even easier in the future.)
- Modeling the Data - Model the data as Facts. You’lll have the opinion you need out-of-the-box, as well as the flexibility to cover your use cases.
If you’re thinking through these problems and want to discuss them, you can join us in the Oso Slack community, along with thousands of developers working on authorization, or schedule time to meet 1x1 with an Oso engineer.
