> ## Documentation Index
> Fetch the complete documentation index at: https://www.osohq.com/docs/llms.txt
> Use this file to discover all available pages before exploring further.
# Quickstart: Oso for Agents
> Route agent traffic through Oso to see what your AI agents are doing.
There are a few ways to get started with Oso depending on your situation.
**Setting up for yourself**: Run the installer on your machine. It configures your coding agents and registers your device in a few minutes. Follow the steps below.
**Deploying across your organization**: Use your MDM to deploy Oso across all employee devices at once. See [Managed Deployment](/oso-for-agents/integrations/managed-deployment).
**Monitoring web-based agents**: Install the Oso browser extension to capture sessions from Claude.ai, ChatGPT, and Gemini. See [Browser Extension](/oso-for-agents/integrations/browser-extension).
***
Get started with Oso by running the installer. It configures your coding agents to route traffic through Oso and registers your device.
You will:
1. Get your Environment ID.
2. Run the Oso installer to configure your tools and register your device.
3. See agent activity in your Oso for Agents dashboard.
## Step 1: Get your Environment ID
1. Go to [ui.osohq.com](https://ui.osohq.com) and log in.
If you are a new user, create an Oso for Agents tenant when prompted.
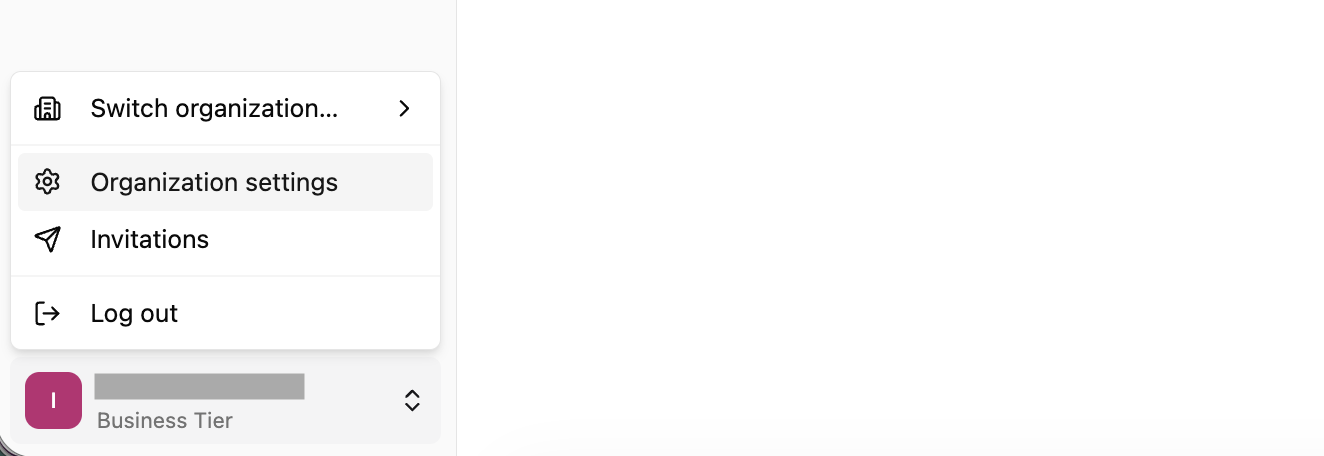
2. Click your organization name in the bottom-left corner and select **Organization settings**.
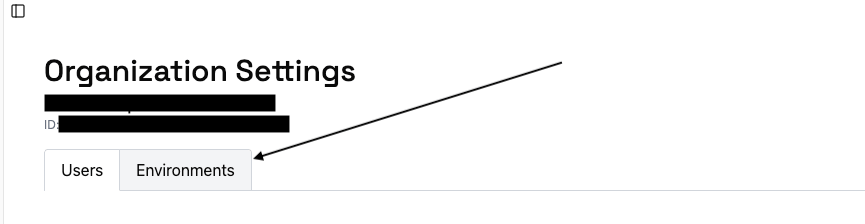
 3. In the settings panel, click the **Environments** tab.
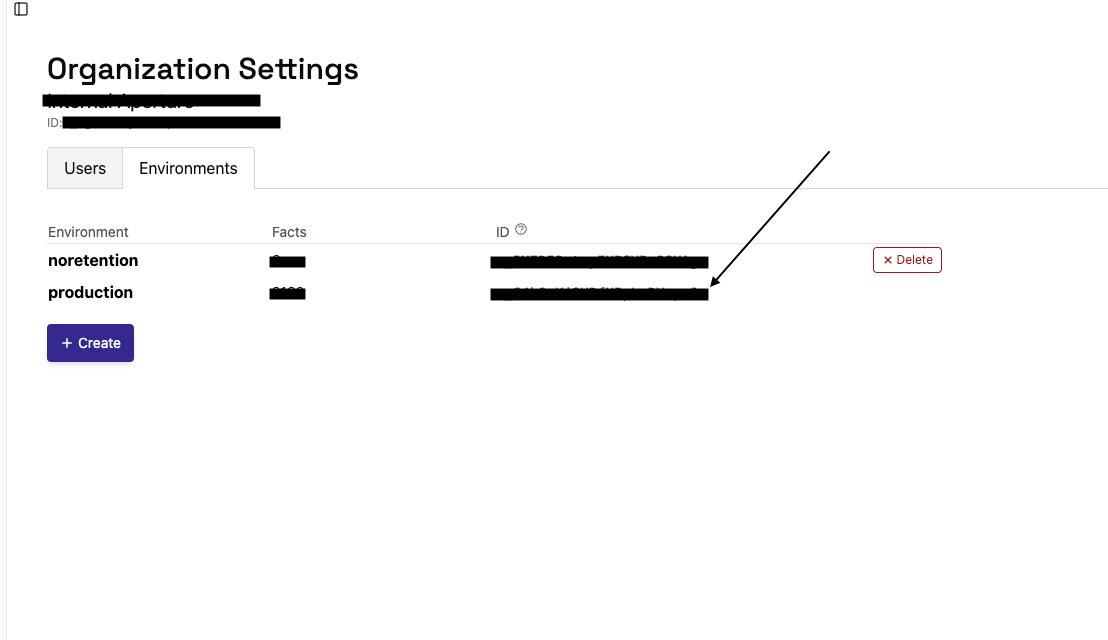
 4. Copy the **Environment ID** for your environment.
 ## Step 2: Install and configure
Run the Oso installer in your terminal:
```sh theme={null}
curl -fsSL https://install.osohq.com/install.sh | sh
```
To install globally on the device, run with `sudo sh` instead:
```sh theme={null}
curl -fsSL https://install.osohq.com/install.sh -o /tmp/install.sh && sudo sh /tmp/install.sh
```
The installer will prompt you for your **Environment ID** (from Step 1) and your **email address**, then automatically configure your tools and register your device with Oso. It also prompts for a **device registration key** — leave this blank, since Oso Cloud doesn't require one.
```sh theme={null}
% curl -fsSL https://install.osohq.com/install.sh | sh
Downloading Oso installer...
Installing user-level configurations.
✔ Oso environment ID · e_....
✔ Email address · example@email.com
Verifying environment... done
✔ Tools to configure (space to toggle, enter to confirm) · Claude Code, Cursor, Codex, Chrome, Claude Desktop Plugin, Safari
Downloading oso-setup... done
Downloading oso-hook... done
Configuring Claude Code...
Configuring Cursor...
Cursor hooks already configured, skipping.
Configuring Codex...
Codex configured to route through https://agents.osohq.cloud.
Configuring Chrome...
Chrome native messaging host installed.
Configuring Claude Desktop Plugin...
Claude Desktop plugin packaged at /Users/jordansinger/oso.plugin.
To install:
1. Open Claude Desktop → Customize → Plugins
2. Upload /Users/jordansinger/oso.plugin
Configuring Safari...
Installation complete!
```
### What the installer configures
The installer prompts you to select which tools to configure. By default all are selected.
| Tool | Config file |
| -------------- | ------------------------------------------------------------ |
| Claude Code | `~/.claude/settings.json` |
| Cursor | `~/.cursor/hooks.json` |
| Codex | `~/.codex/config.toml` |
| Chrome | `~/Library/Google/Chrome/NativeMessagingHosts/com.osohq.oso` |
| Github Copilot | `~/.copilot/hooks/oso.json` |
### Manual configuration
If you prefer to configure tools by hand, expand the sections below.
Add the following `hooks` block to `~/.claude/settings.json`, replacing `` with your home directory (e.g. `/home/yourname` or `/Users/yourname`):
```json theme={null}
{
"hooks": {
"UserPromptSubmit": [{"matcher": "", "hooks": [{"type": "command", "command": "/.local/bin/oso-hook", "timeout": 5}]}],
"PreToolUse": [{"matcher": "", "hooks": [{"type": "command", "command": "/.local/bin/oso-hook", "timeout": 5}]}],
"PostToolUse": [{"matcher": "", "hooks": [{"type": "command", "command": "/.local/bin/oso-hook", "timeout": 5}]}],
"PostToolUseFailure": [{"matcher": "", "hooks": [{"type": "command", "command": "/.local/bin/oso-hook", "timeout": 5}]}],
"Stop": [{"matcher": "", "hooks": [{"type": "command", "command": "/.local/bin/oso-hook", "timeout": 5}]}],
"SubagentStop": [{"matcher": "", "hooks": [{"type": "command", "command": "/.local/bin/oso-hook", "timeout": 5}]}]
}
}
```
If you previously routed Claude Code through the Oso proxy with `ANTHROPIC_BASE_URL`, remove it from your `settings.json` `env` block. Hooks capture the same activity, and keeping both produces duplicate events.
Create a model provider configuration in `~/.codex/config.toml`:
```toml theme={null}
model = "gpt-5.4"
model_provider = "oso"
[model_providers.oso]
name = "Oso"
base_url = "https://agents.osohq.cloud"
requires_openai_auth = true
[model_providers.oso.http_headers]
OSO_ENVIRONMENT = ""
X-Identity = "|"
```
Replace `` with the Environment ID from Step 1.
Enter your email into the `X-Identity` header to allow Oso to correlate sessions with a specific user.
If you have `OPENAI_BASE_URL` set as an environment variable, unset it so the model provider configuration takes effect.
Create `~/.copilot/hooks/oso.json` with the following content, replacing `` with your home directory (e.g. `/home/yourname` or `/Users/yourname`):
```json theme={null}
{
"hooks": {
"UserPromptSubmit": [{"type": "command", "command": "/.local/bin/oso-hook --agent github-copilot", "timeout": 5}],
"PreToolUse": [{"type": "command", "command": "/.local/bin/oso-hook --agent github-copilot", "timeout": 5}],
"PostToolUse": [{"type": "command", "command": "/.local/bin/oso-hook --agent github-copilot", "timeout": 5}],
"PostToolUseFailure": [{"type": "command", "command": "/.local/bin/oso-hook --agent github-copilot", "timeout": 5}],
"Stop": [{"type": "command", "command": "/.local/bin/oso-hook --agent github-copilot", "timeout": 5}],
"SubagentStop": [{"type": "command", "command": "/.local/bin/oso-hook --agent github-copilot", "timeout": 5}]
}
}
```
GitHub Copilot hooks can only be installed at the user level. There is no global configuration directory for Copilot, so root/system-wide installation is not supported.
## Step 3: Monitor agent activity in the Oso dashboard
Use your coding agents as normal. Activity will appear in your [Oso for Agents dashboard](https://ui.osohq.com).
## Uninstalling
Run `oso-setup uninstall` the same way you installed - without `sudo` for a user install,
or with `sudo` if you ran the installer as root.
```sh theme={null}
# User install
~/.local/bin/oso-setup uninstall
# Global install (if you ran with sudo)
sudo /usr/local/bin/oso-setup uninstall
```
For shared config files (Claude Code, Cursor, Codex), only Oso's own entries are removed,
while your other settings are left intact. Files that Oso owns outright (Chrome and Firefox
native-messaging manifests, the GitHub Copilot hook, the Claude Desktop plugin, etc.) are removed
entirely. The uninstaller also removes your identity file, debug logs, and the `oso-hook`
and `oso-setup` binaries. It's safe to run more than once.
For the Claude Desktop Plugin, you must separately remove it through
**Claude Desktop → Customize → Plugins**.
Pass `--keep-logs` to retain oso-hook debug logs:
```sh theme={null}
~/.local/bin/oso-setup uninstall --keep-logs
# or
sudo /usr/local/bin/oso-setup uninstall --keep-logs
```
### Next steps
* **[Shadow AI](/oso-for-agents/shadow-ai)**: Discover what AI agents are in use across your organization.
* **[Session Monitoring](/oso-for-agents/session-monitoring)**: See what agents are doing inside their sessions.
* **[Alerts](/oso-for-agents/alerts)**: Set up monitoring for unsanctioned usage and sensitive content.
* **[Managed Deployment](/oso-for-agents/integrations/managed-deployment)**: Deploy Oso across your organization via MDM or IT policy.
* **[Other integrations](/oso-for-agents/integrations/edge-proxy)**: Network-level and endpoint-based discovery via EDR or Tailscale Aperture.
## Step 2: Install and configure
Run the Oso installer in your terminal:
```sh theme={null}
curl -fsSL https://install.osohq.com/install.sh | sh
```
To install globally on the device, run with `sudo sh` instead:
```sh theme={null}
curl -fsSL https://install.osohq.com/install.sh -o /tmp/install.sh && sudo sh /tmp/install.sh
```
The installer will prompt you for your **Environment ID** (from Step 1) and your **email address**, then automatically configure your tools and register your device with Oso. It also prompts for a **device registration key** — leave this blank, since Oso Cloud doesn't require one.
```sh theme={null}
% curl -fsSL https://install.osohq.com/install.sh | sh
Downloading Oso installer...
Installing user-level configurations.
✔ Oso environment ID · e_....
✔ Email address · example@email.com
Verifying environment... done
✔ Tools to configure (space to toggle, enter to confirm) · Claude Code, Cursor, Codex, Chrome, Claude Desktop Plugin, Safari
Downloading oso-setup... done
Downloading oso-hook... done
Configuring Claude Code...
Configuring Cursor...
Cursor hooks already configured, skipping.
Configuring Codex...
Codex configured to route through https://agents.osohq.cloud.
Configuring Chrome...
Chrome native messaging host installed.
Configuring Claude Desktop Plugin...
Claude Desktop plugin packaged at /Users/jordansinger/oso.plugin.
To install:
1. Open Claude Desktop → Customize → Plugins
2. Upload /Users/jordansinger/oso.plugin
Configuring Safari...
Installation complete!
```
### What the installer configures
The installer prompts you to select which tools to configure. By default all are selected.
| Tool | Config file |
| -------------- | ------------------------------------------------------------ |
| Claude Code | `~/.claude/settings.json` |
| Cursor | `~/.cursor/hooks.json` |
| Codex | `~/.codex/config.toml` |
| Chrome | `~/Library/Google/Chrome/NativeMessagingHosts/com.osohq.oso` |
| Github Copilot | `~/.copilot/hooks/oso.json` |
### Manual configuration
If you prefer to configure tools by hand, expand the sections below.
Add the following `hooks` block to `~/.claude/settings.json`, replacing `` with your home directory (e.g. `/home/yourname` or `/Users/yourname`):
```json theme={null}
{
"hooks": {
"UserPromptSubmit": [{"matcher": "", "hooks": [{"type": "command", "command": "/.local/bin/oso-hook", "timeout": 5}]}],
"PreToolUse": [{"matcher": "", "hooks": [{"type": "command", "command": "/.local/bin/oso-hook", "timeout": 5}]}],
"PostToolUse": [{"matcher": "", "hooks": [{"type": "command", "command": "/.local/bin/oso-hook", "timeout": 5}]}],
"PostToolUseFailure": [{"matcher": "", "hooks": [{"type": "command", "command": "/.local/bin/oso-hook", "timeout": 5}]}],
"Stop": [{"matcher": "", "hooks": [{"type": "command", "command": "/.local/bin/oso-hook", "timeout": 5}]}],
"SubagentStop": [{"matcher": "", "hooks": [{"type": "command", "command": "/.local/bin/oso-hook", "timeout": 5}]}]
}
}
```
If you previously routed Claude Code through the Oso proxy with `ANTHROPIC_BASE_URL`, remove it from your `settings.json` `env` block. Hooks capture the same activity, and keeping both produces duplicate events.
Create a model provider configuration in `~/.codex/config.toml`:
```toml theme={null}
model = "gpt-5.4"
model_provider = "oso"
[model_providers.oso]
name = "Oso"
base_url = "https://agents.osohq.cloud"
requires_openai_auth = true
[model_providers.oso.http_headers]
OSO_ENVIRONMENT = ""
X-Identity = "|"
```
Replace `` with the Environment ID from Step 1.
Enter your email into the `X-Identity` header to allow Oso to correlate sessions with a specific user.
If you have `OPENAI_BASE_URL` set as an environment variable, unset it so the model provider configuration takes effect.
Create `~/.copilot/hooks/oso.json` with the following content, replacing `` with your home directory (e.g. `/home/yourname` or `/Users/yourname`):
```json theme={null}
{
"hooks": {
"UserPromptSubmit": [{"type": "command", "command": "/.local/bin/oso-hook --agent github-copilot", "timeout": 5}],
"PreToolUse": [{"type": "command", "command": "/.local/bin/oso-hook --agent github-copilot", "timeout": 5}],
"PostToolUse": [{"type": "command", "command": "/.local/bin/oso-hook --agent github-copilot", "timeout": 5}],
"PostToolUseFailure": [{"type": "command", "command": "/.local/bin/oso-hook --agent github-copilot", "timeout": 5}],
"Stop": [{"type": "command", "command": "/.local/bin/oso-hook --agent github-copilot", "timeout": 5}],
"SubagentStop": [{"type": "command", "command": "/.local/bin/oso-hook --agent github-copilot", "timeout": 5}]
}
}
```
GitHub Copilot hooks can only be installed at the user level. There is no global configuration directory for Copilot, so root/system-wide installation is not supported.
## Step 3: Monitor agent activity in the Oso dashboard
Use your coding agents as normal. Activity will appear in your [Oso for Agents dashboard](https://ui.osohq.com).
## Uninstalling
Run `oso-setup uninstall` the same way you installed - without `sudo` for a user install,
or with `sudo` if you ran the installer as root.
```sh theme={null}
# User install
~/.local/bin/oso-setup uninstall
# Global install (if you ran with sudo)
sudo /usr/local/bin/oso-setup uninstall
```
For shared config files (Claude Code, Cursor, Codex), only Oso's own entries are removed,
while your other settings are left intact. Files that Oso owns outright (Chrome and Firefox
native-messaging manifests, the GitHub Copilot hook, the Claude Desktop plugin, etc.) are removed
entirely. The uninstaller also removes your identity file, debug logs, and the `oso-hook`
and `oso-setup` binaries. It's safe to run more than once.
For the Claude Desktop Plugin, you must separately remove it through
**Claude Desktop → Customize → Plugins**.
Pass `--keep-logs` to retain oso-hook debug logs:
```sh theme={null}
~/.local/bin/oso-setup uninstall --keep-logs
# or
sudo /usr/local/bin/oso-setup uninstall --keep-logs
```
### Next steps
* **[Shadow AI](/oso-for-agents/shadow-ai)**: Discover what AI agents are in use across your organization.
* **[Session Monitoring](/oso-for-agents/session-monitoring)**: See what agents are doing inside their sessions.
* **[Alerts](/oso-for-agents/alerts)**: Set up monitoring for unsanctioned usage and sensitive content.
* **[Managed Deployment](/oso-for-agents/integrations/managed-deployment)**: Deploy Oso across your organization via MDM or IT policy.
* **[Other integrations](/oso-for-agents/integrations/edge-proxy)**: Network-level and endpoint-based discovery via EDR or Tailscale Aperture.